Elf: Build Breakdown

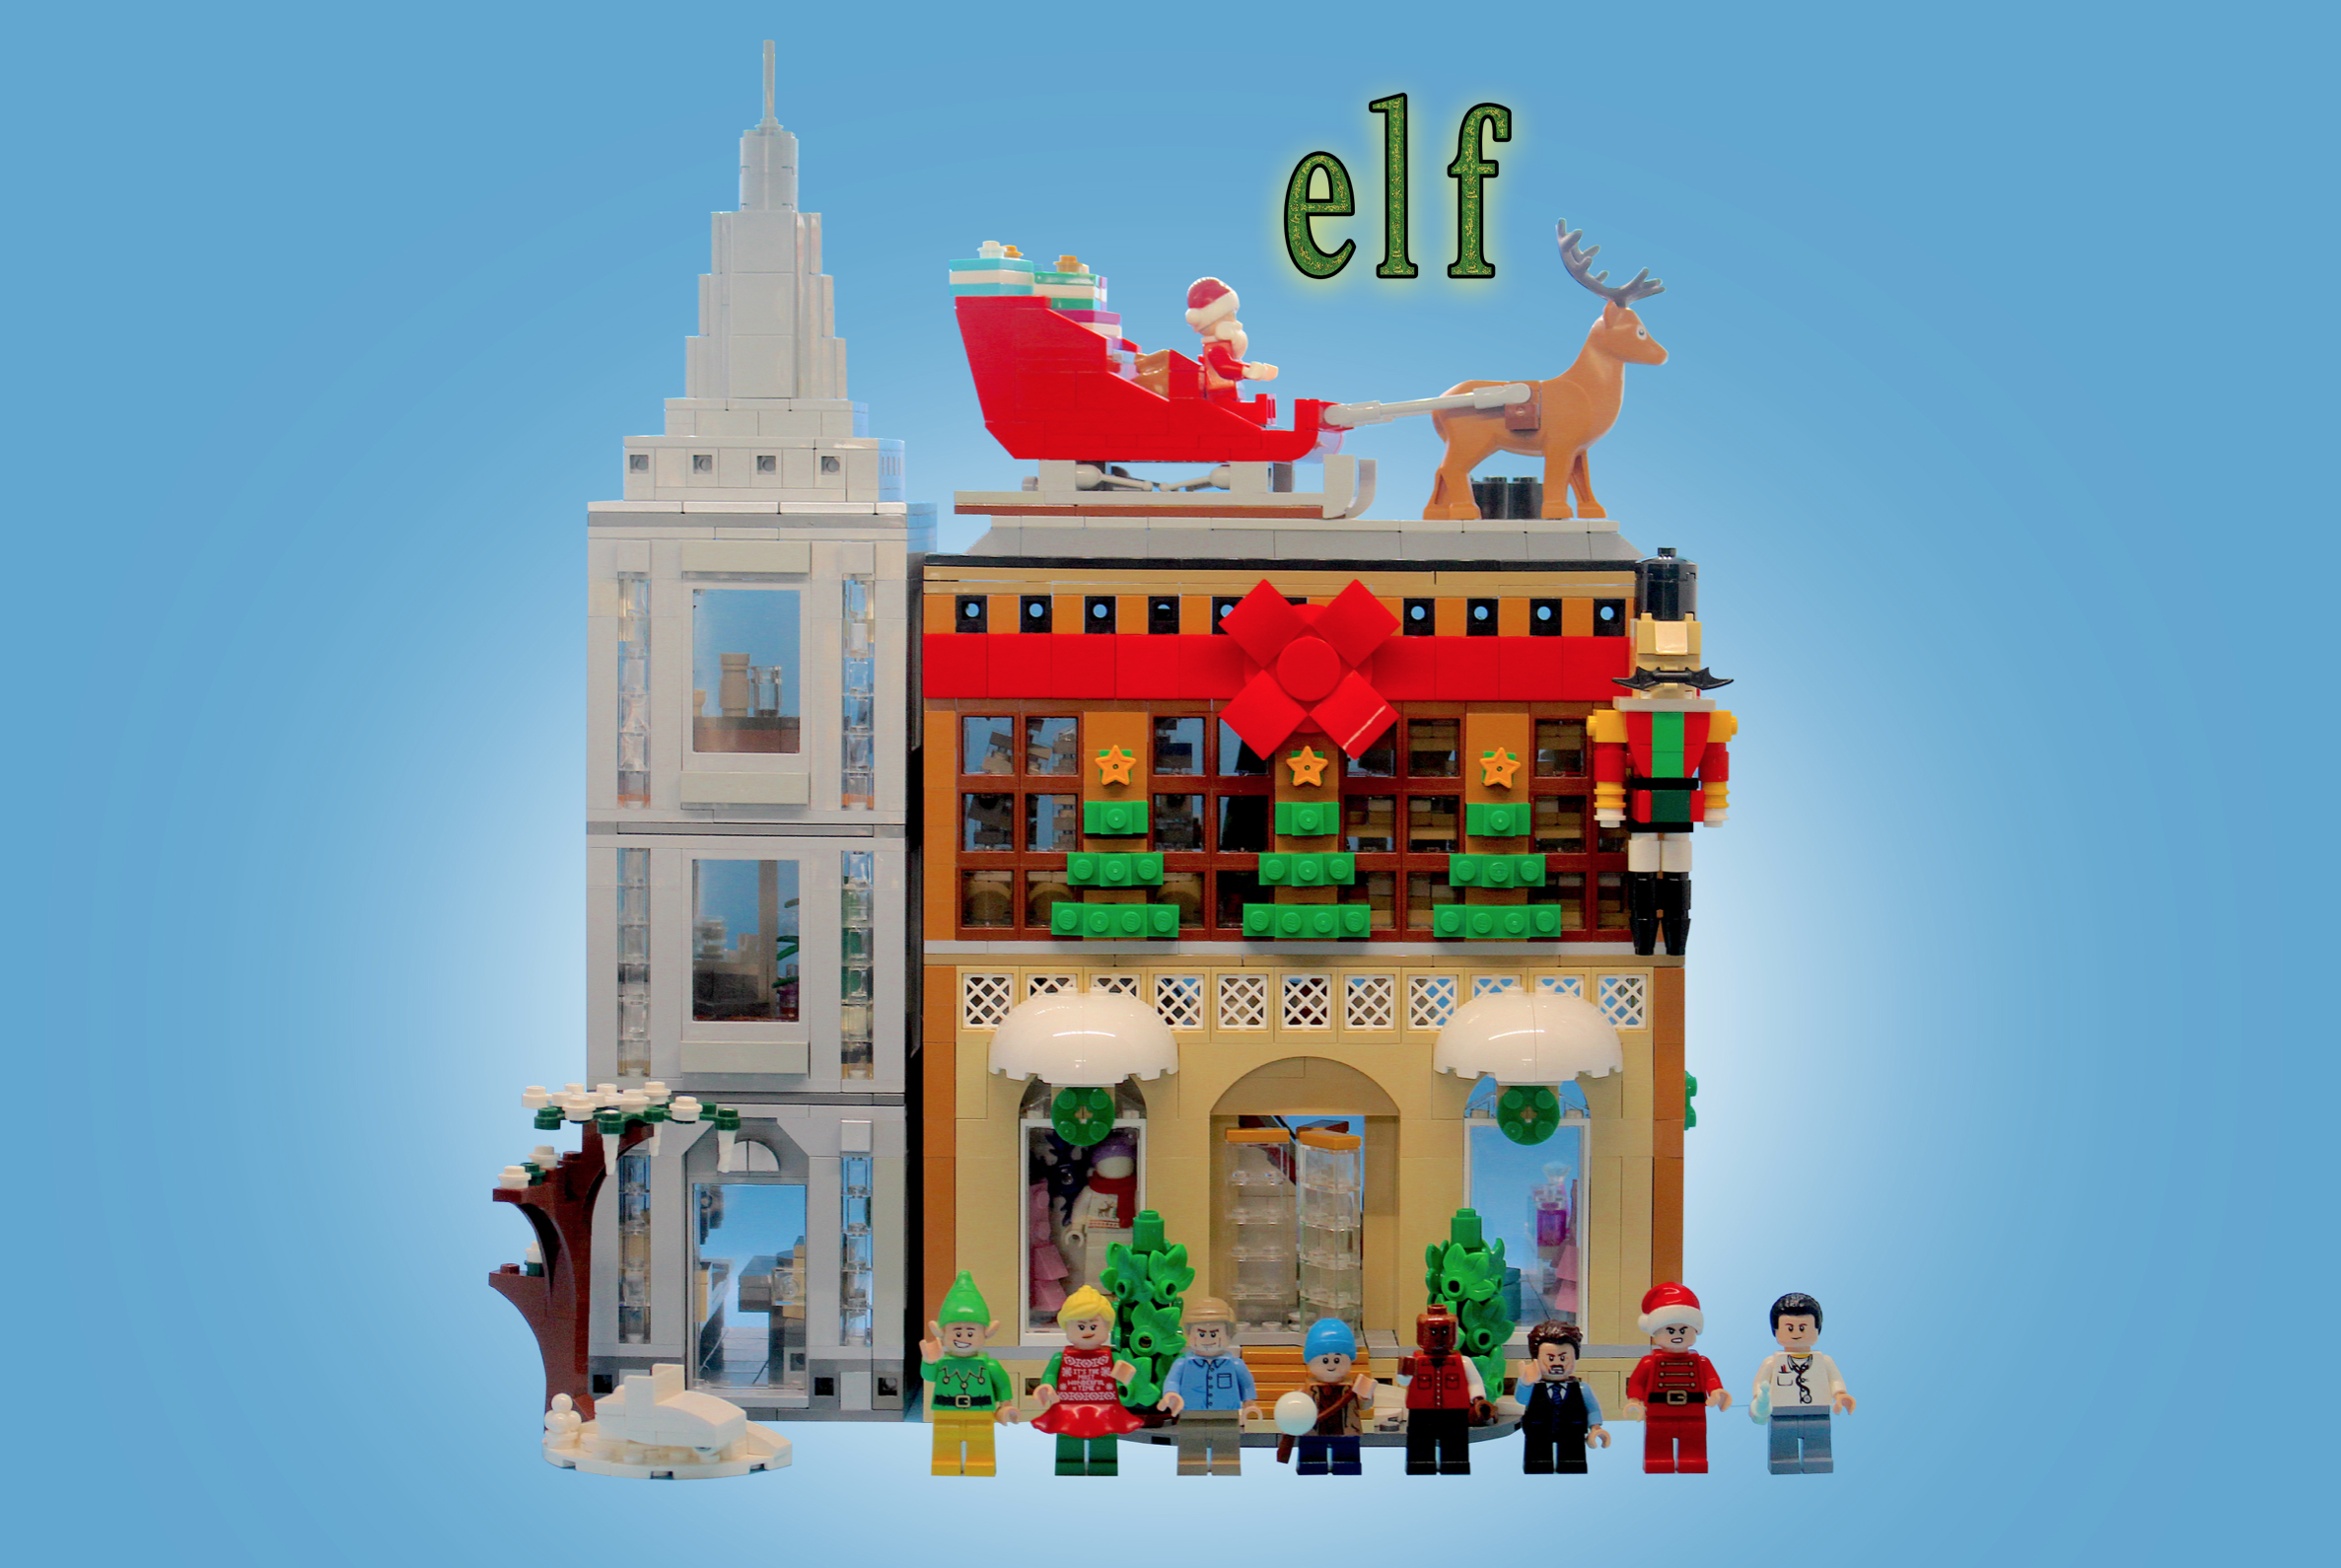
In 2023, I designed my first-ever set for LEGO IDEAS that could hopefully someday become a real LEGO product: ELF! Featuring a modular Gimbels Department Store, skyscraper, and nine minifigures, the set celebrates the 20th anniversary of the classic holiday movie. If you’d like to see Elf turned into a real LEGO set for the holidays, you can vote for it here.

1. DESIGNING THE INTERIOR

I knew from get-go that the build had to incorporate as many Elf-tastic movie moments as possible. Inspired by the “Home Alone” set that came out in 2021, I wanted to reflect these moments in a modular-style building chock-full of interior details. The Gimbels Department Store was an obvious first choice; but then I realized just as many famous movie moments happen in the Empire State Building! So I conceived the set as two separate structures, attached by hinges.

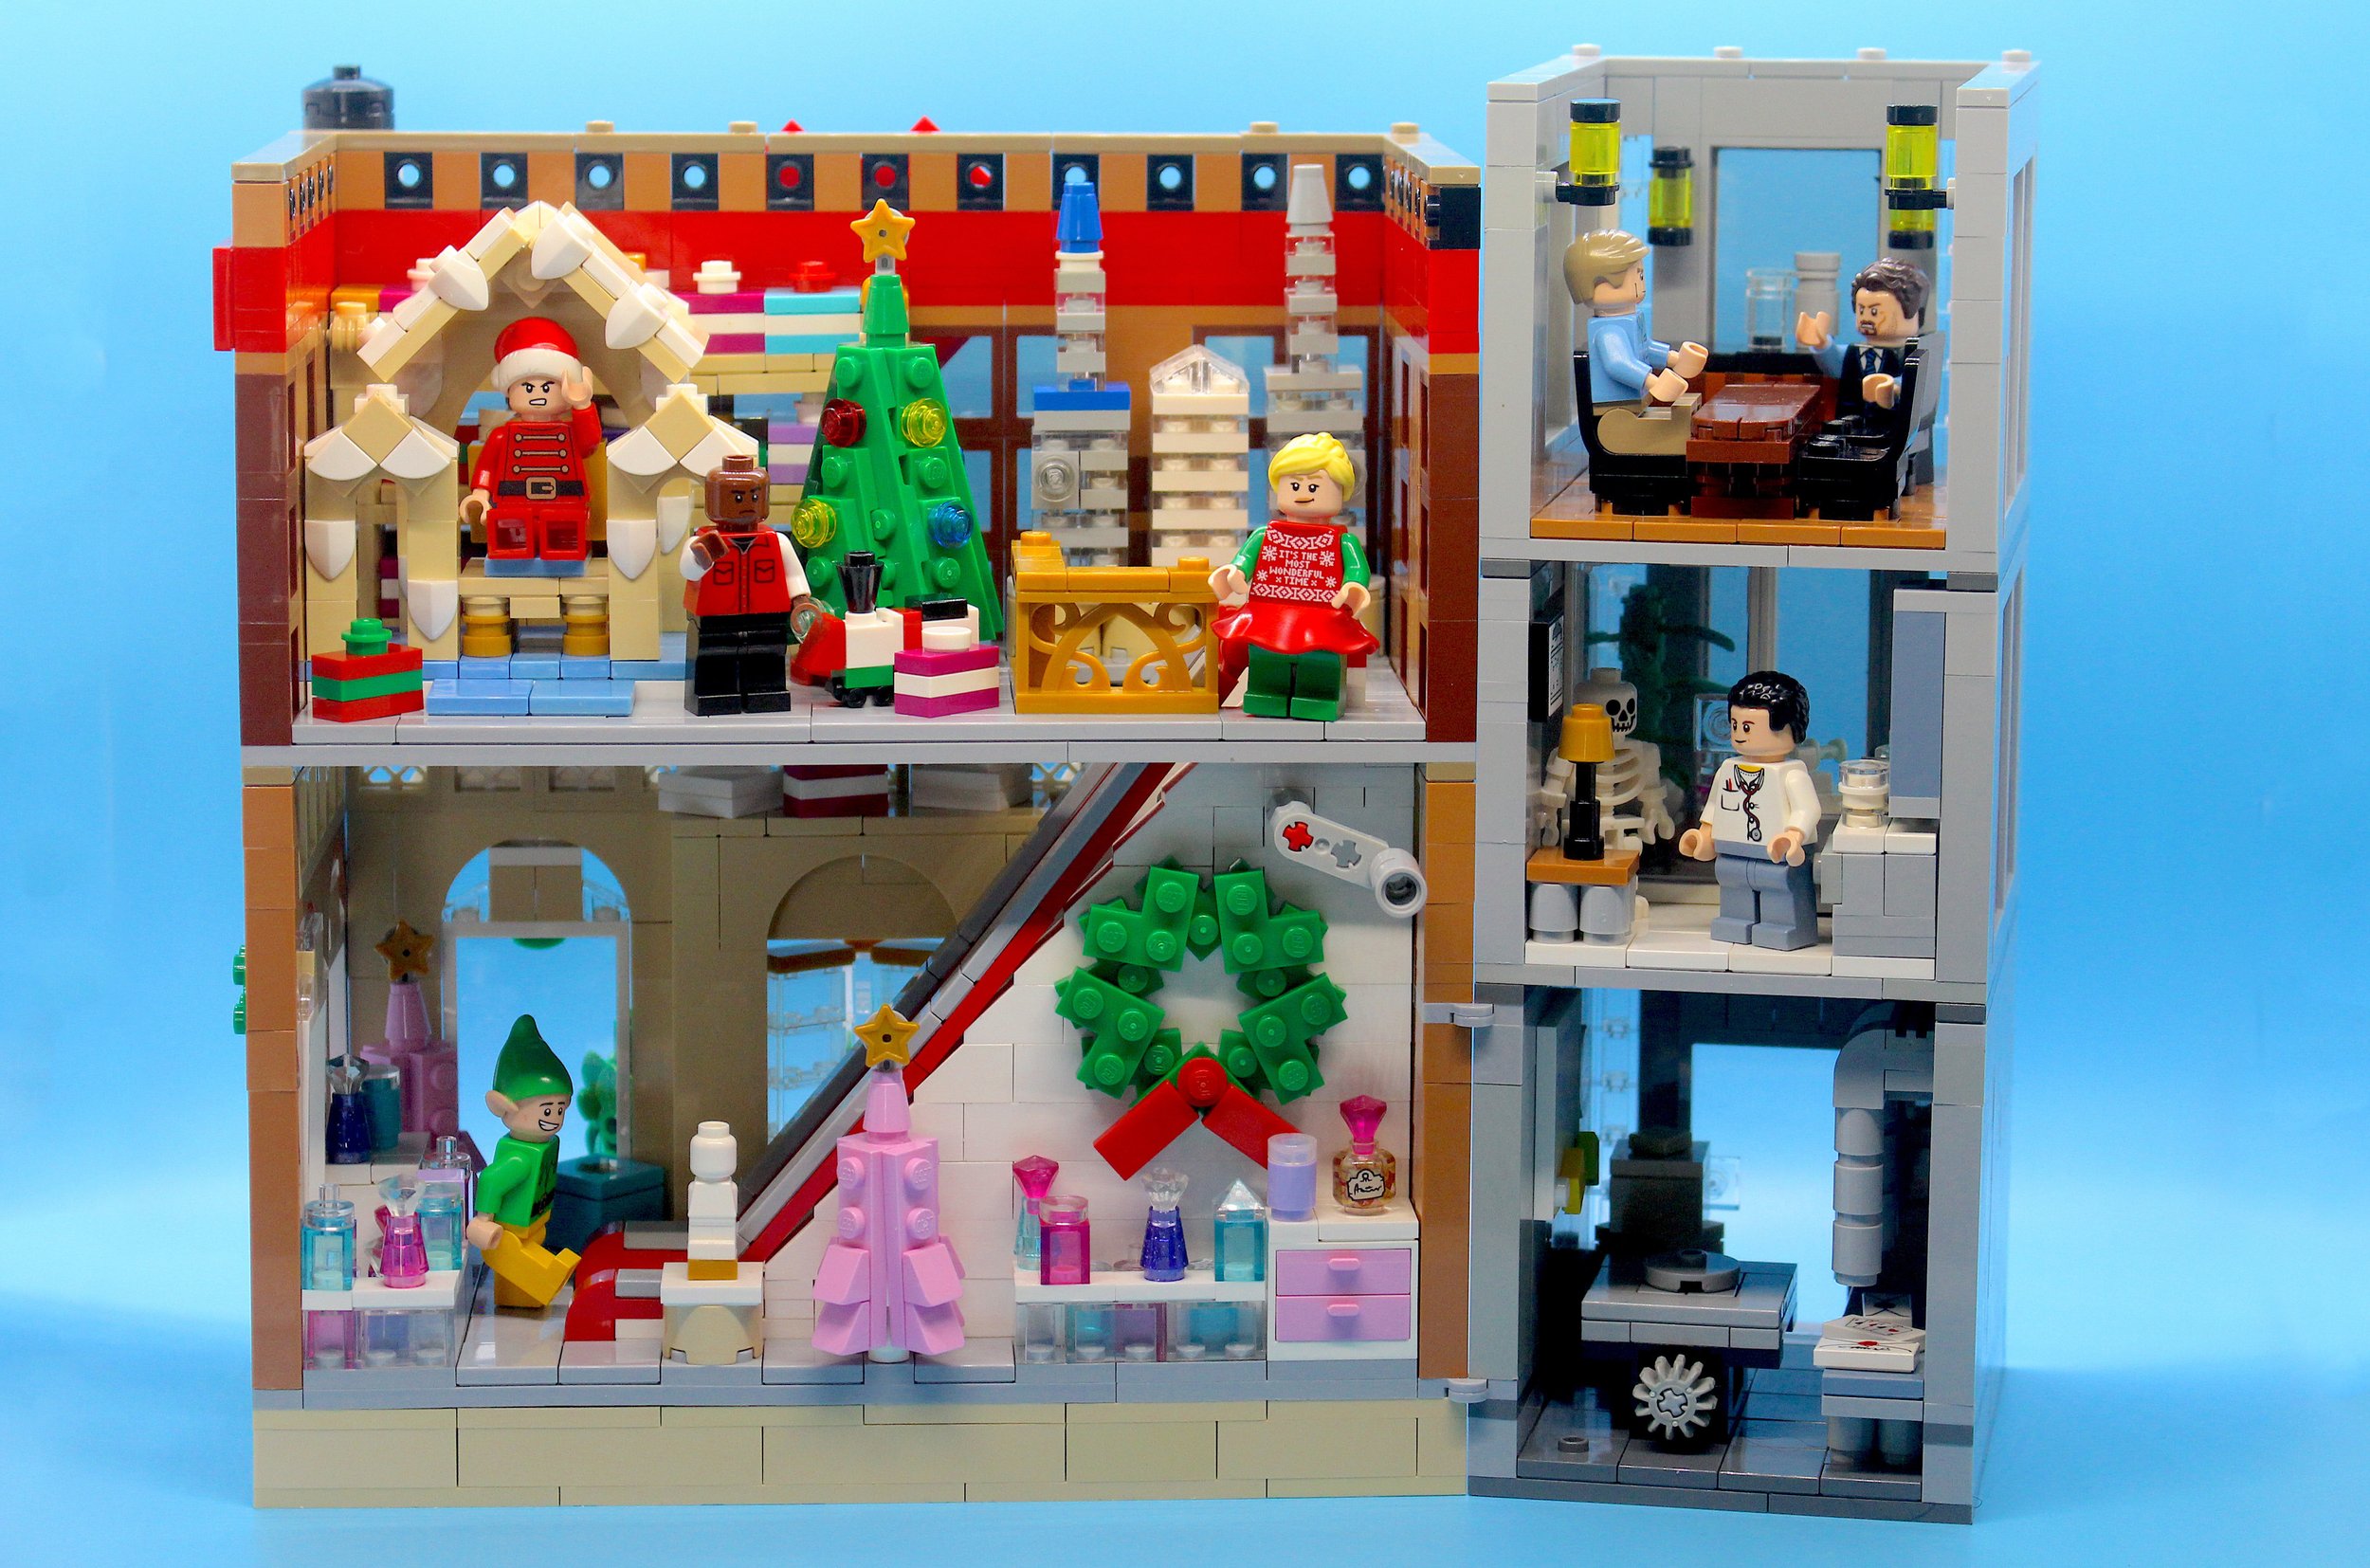
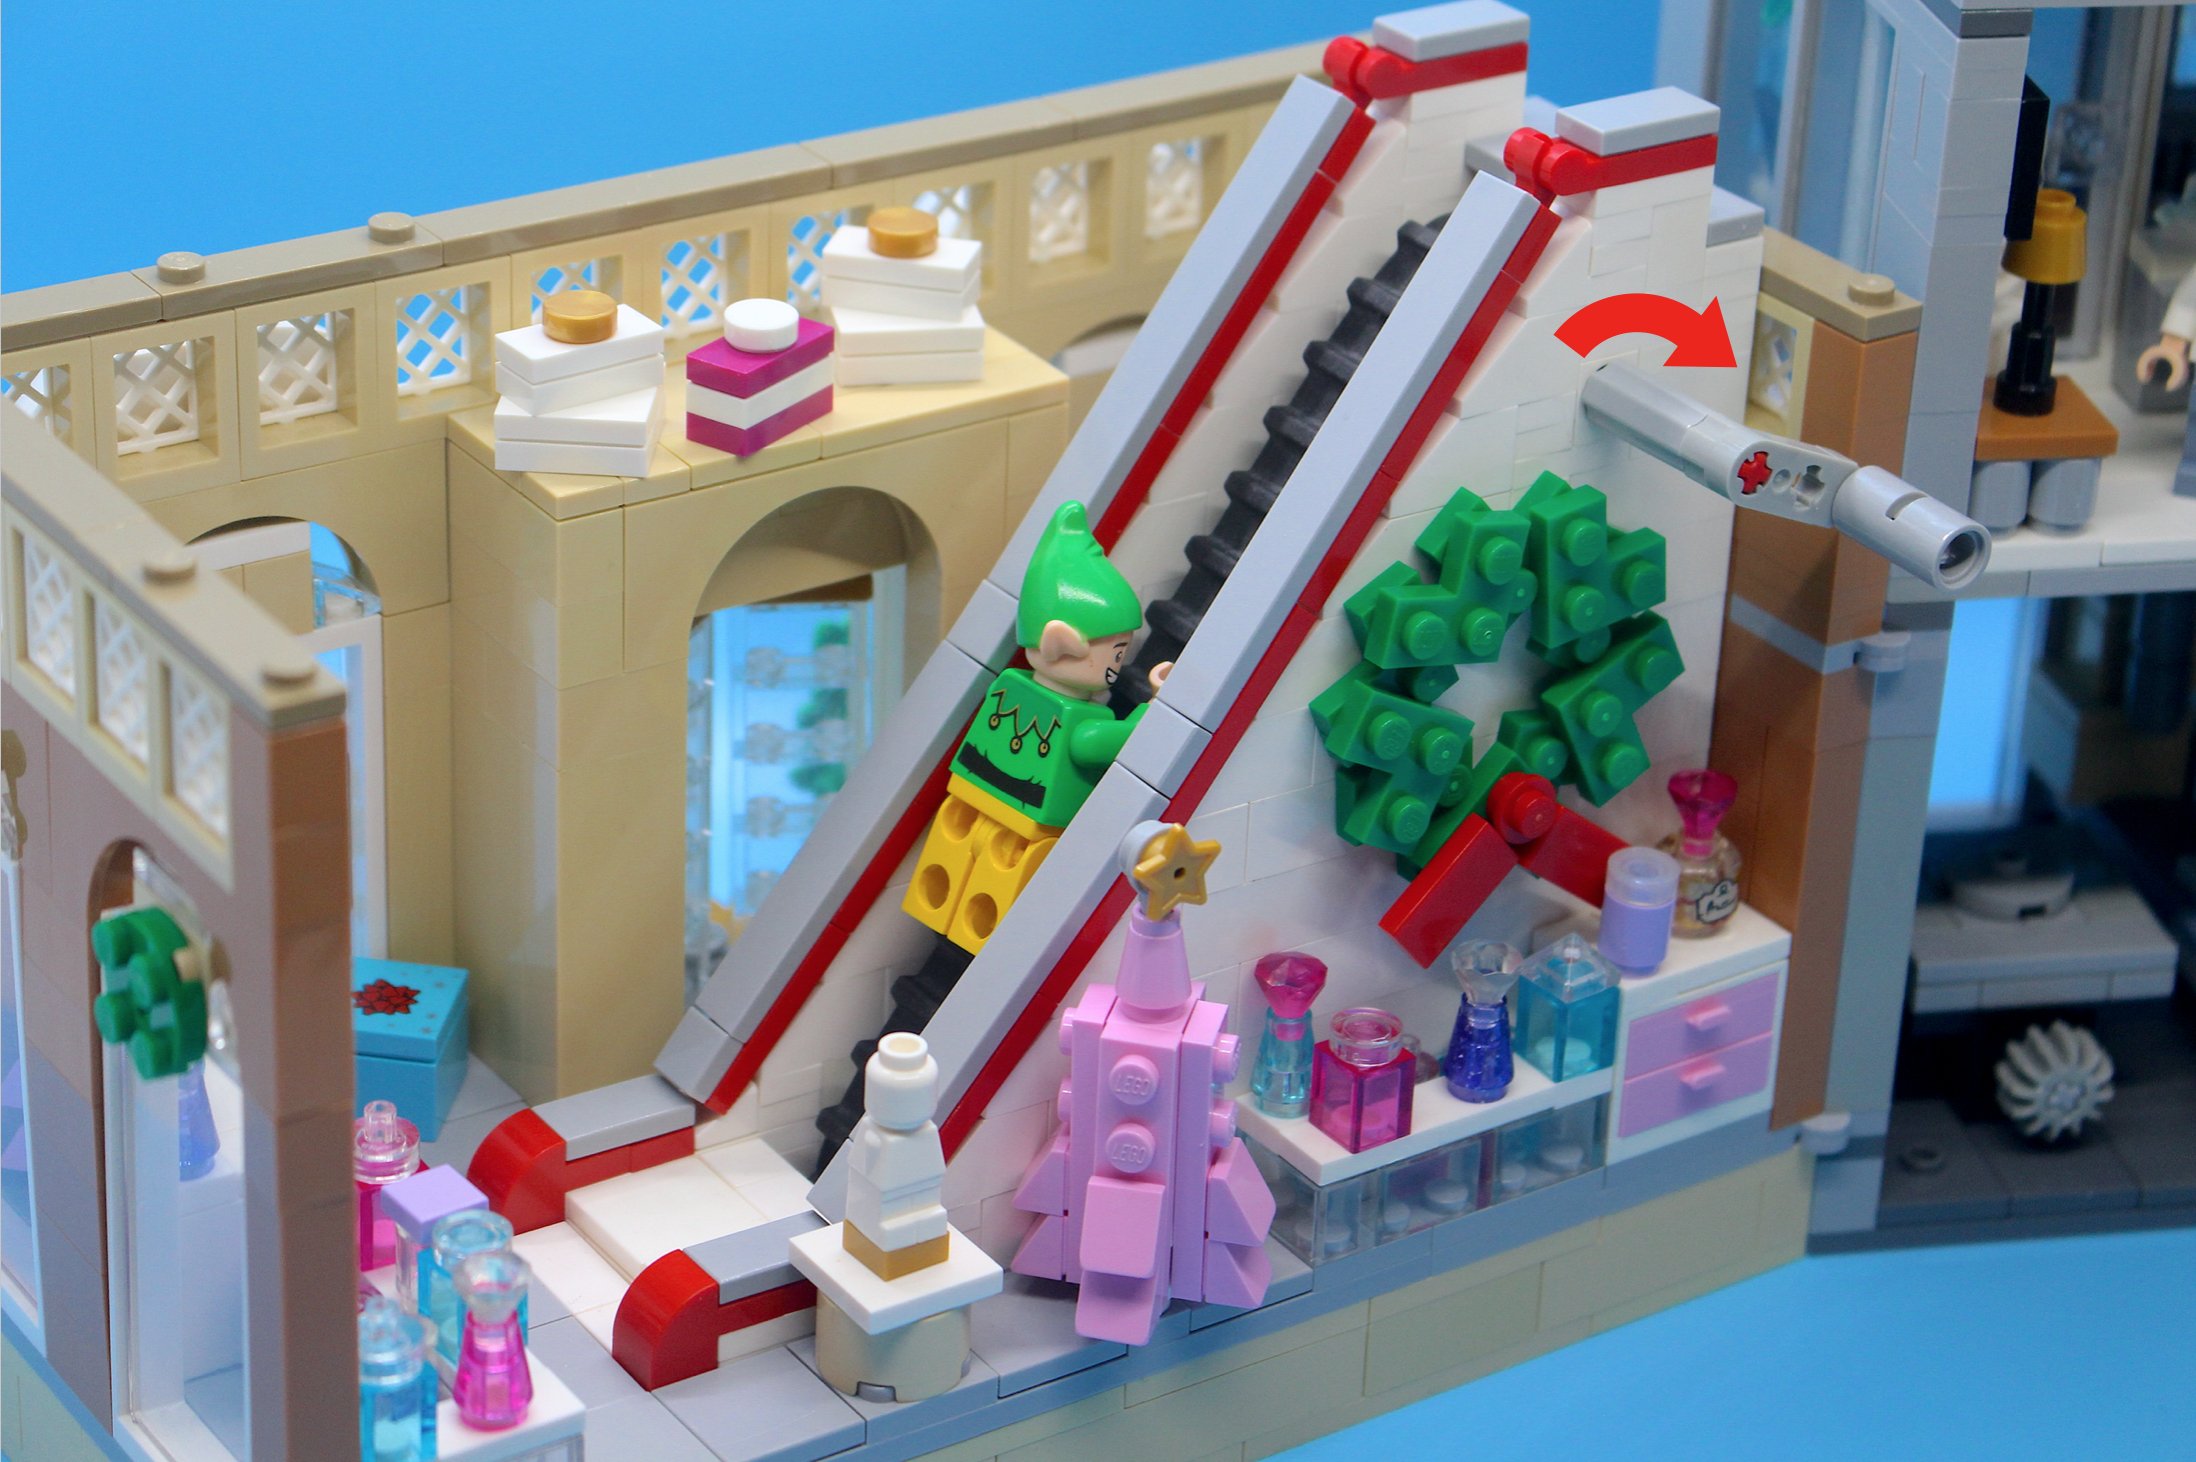
The interior construction of the department store all depended on the most essential part: the escalator that Buddy does the splits on! Creating a working escalator was one of the challenges I set for myself in the project. I ended up using a tire tread with large ridges, to resemble steps, and attached it to wheels on a crank shaft. The escalator can be cranked to move Buddy up and down (funny enough, it works the best when he’s sprawled out on the escalator just like in the movie).

Because the treads have to dip below the floor line, I needed to raise the floor of the department store by about two bricks. And since the escalator ascends through to the second floor, there had to be a gap in the floor of the second story. Buddy can seamlessly go up and down the escalator whenever he wants now!

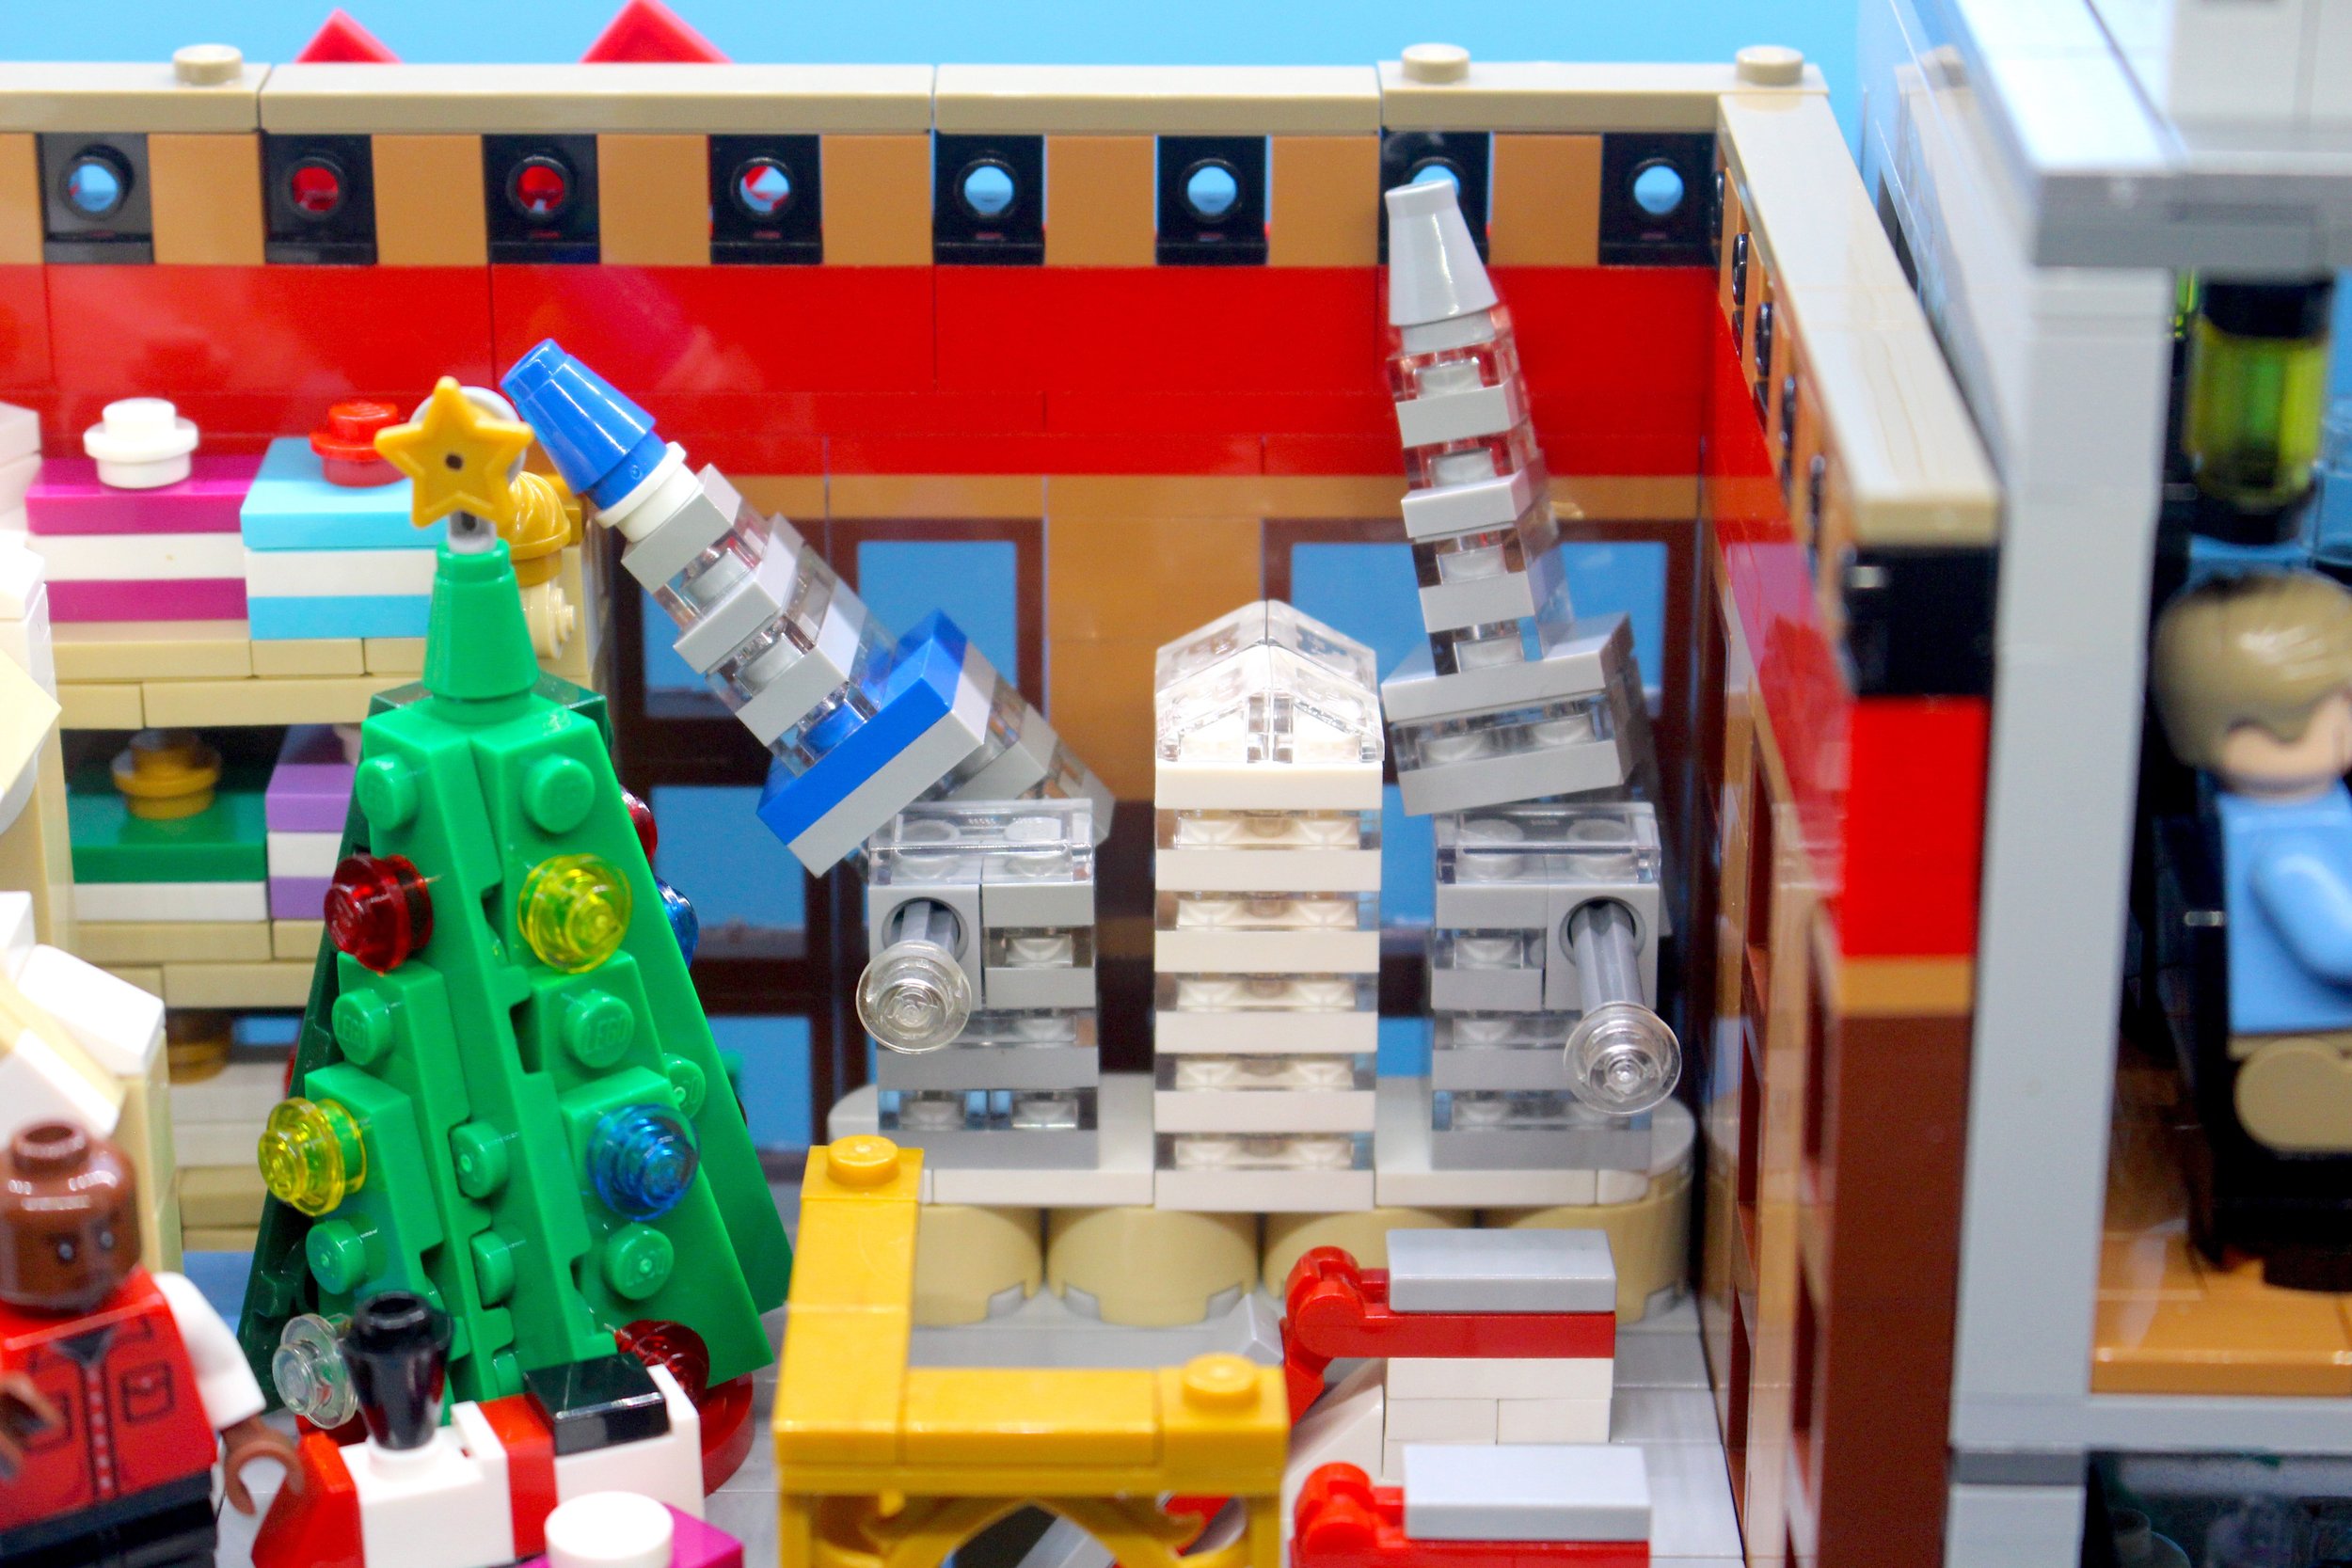
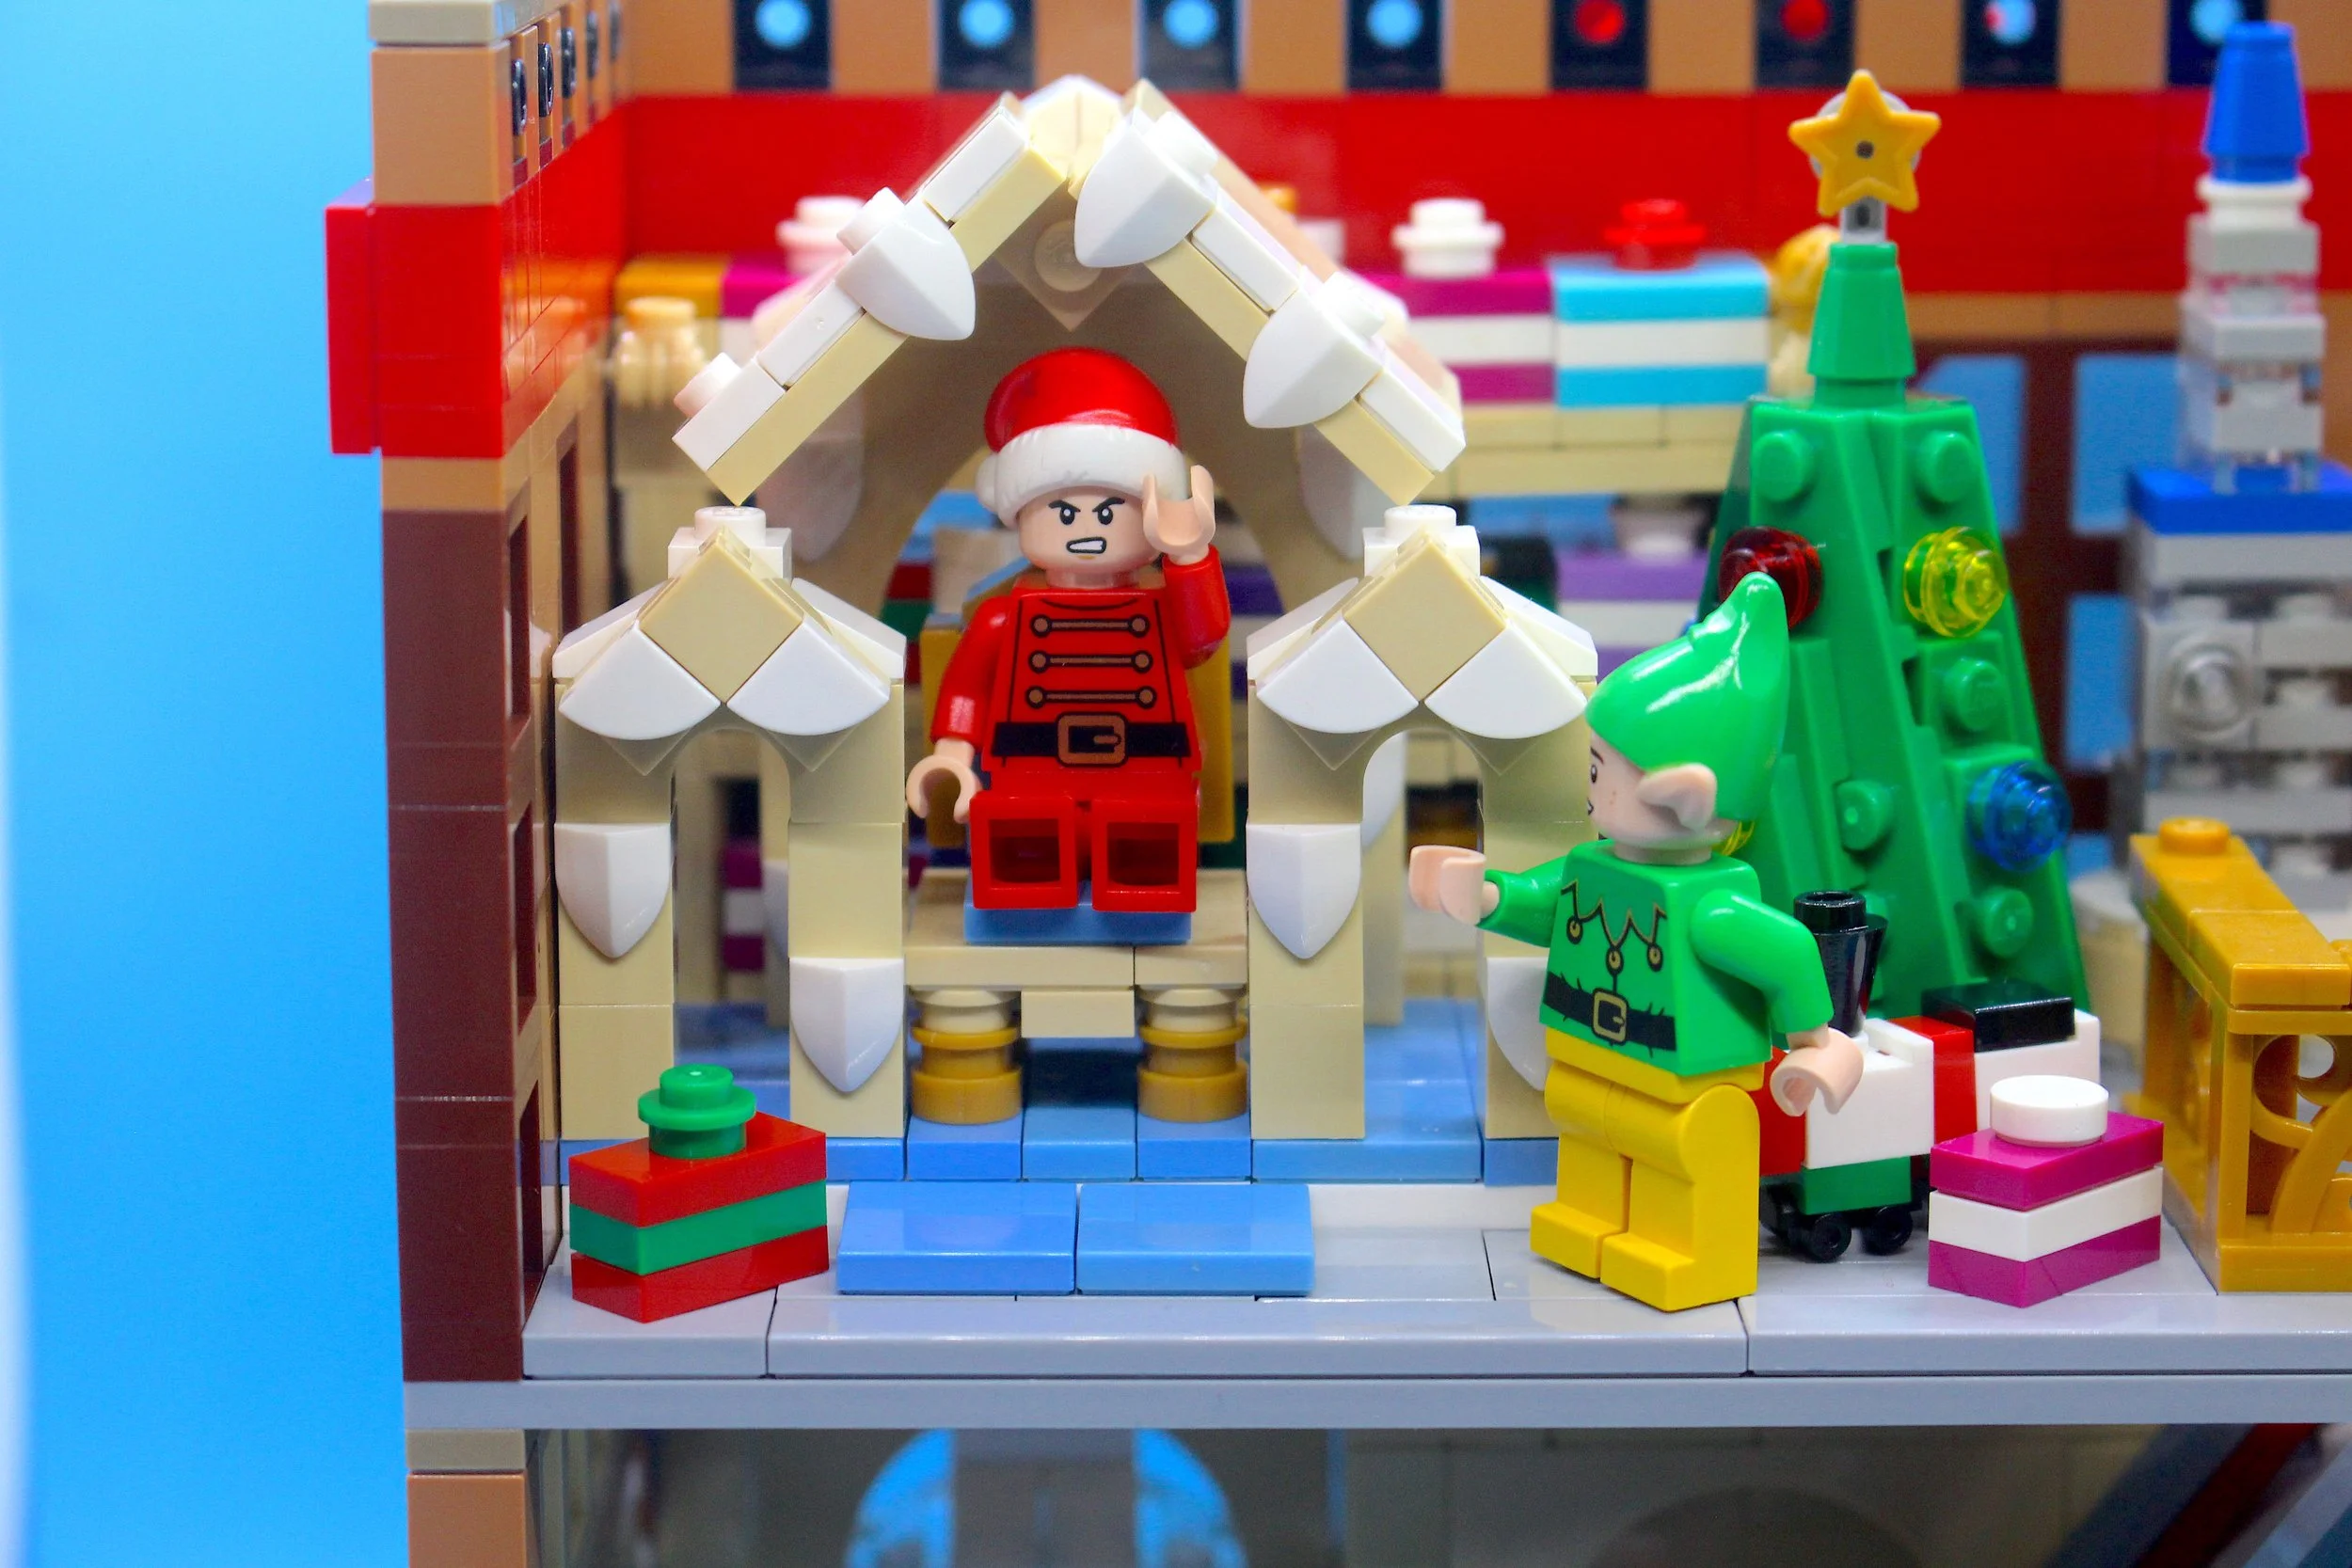
While the bottom floor is dominated by the escalator, the top floor is filled with details and scenes from the movie. I had to include Santa’s throne, made by Buddy himself. Of course, it ends up being occupied by “Fake” Santa who chases Buddy around the store. My favorite scene was always when Fake Santa knocks down the skyscrapers of small plastic bricks (unclear if they’re LEGO, but they might be!) — so I had to include that here for some meta LEGO-within-LEGO action. The skyscrapers can tumble apart if you pull out the pins that keep them just barely together. If Fake Santa knocks them over with a bat, they’ll go flying!

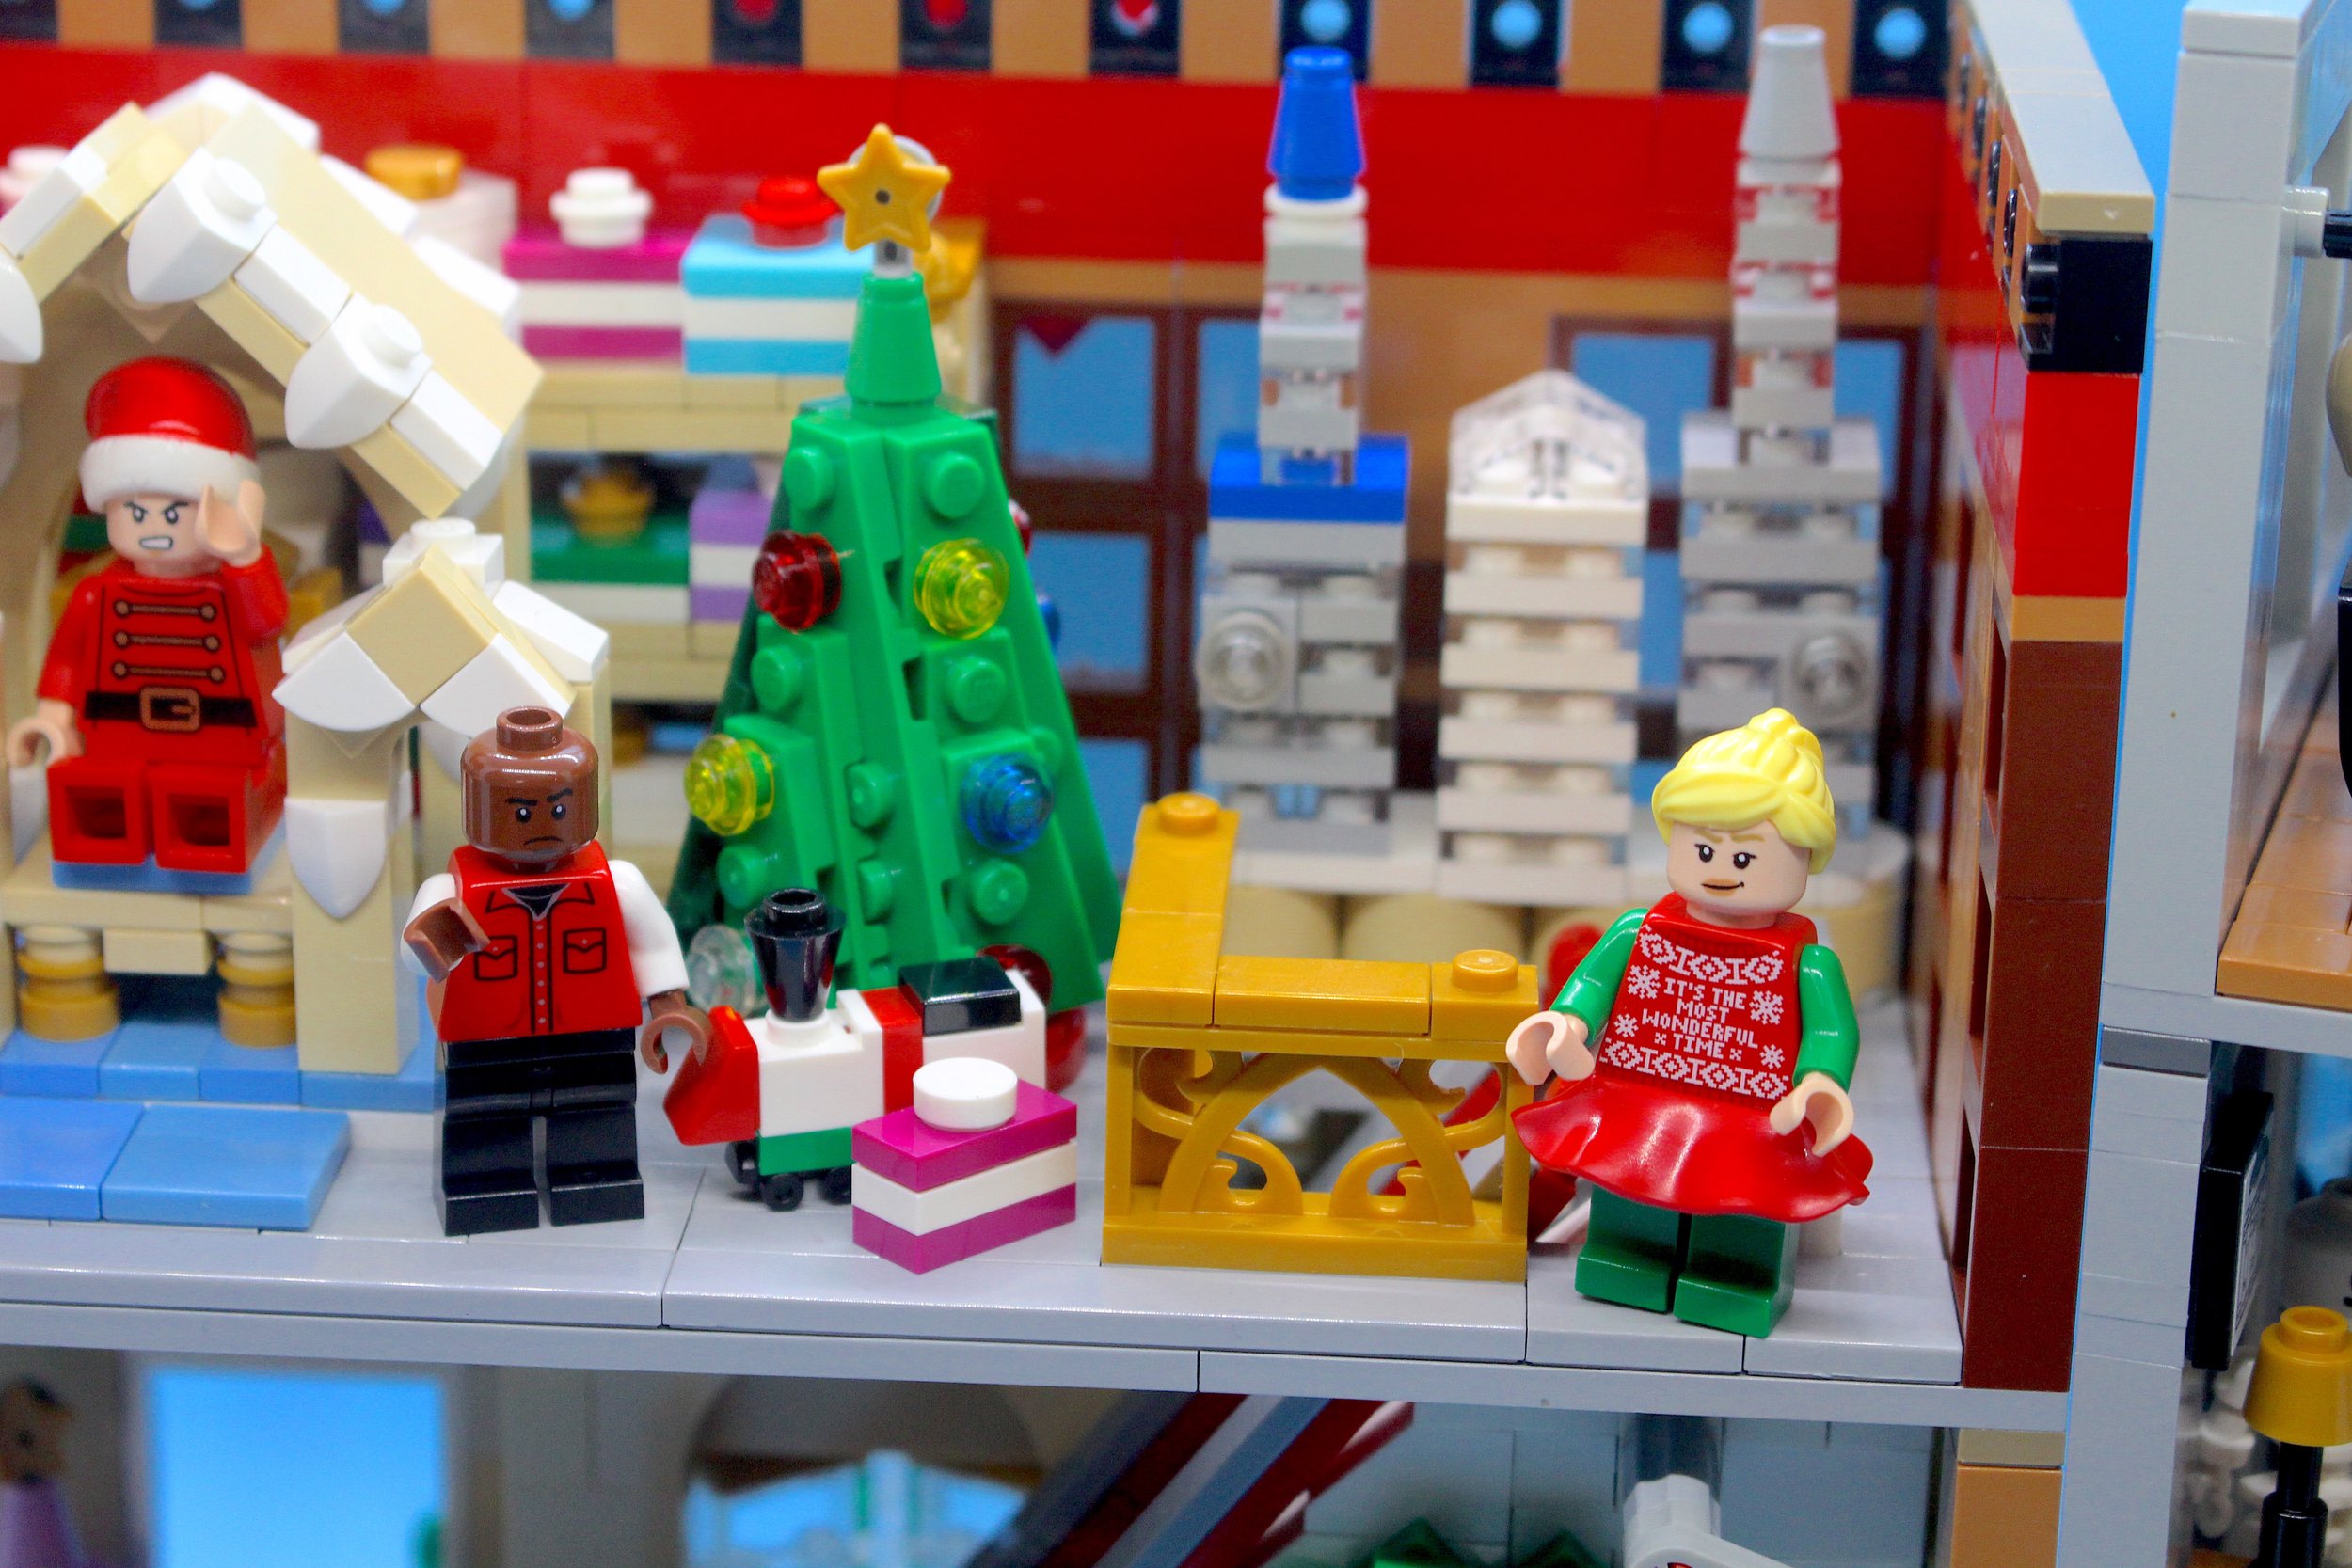
I also added a Christmas tree in the top floor that Jovie can decorate, plus presents all around. There’s a massive shelf of presents in the back, behind the Santa throne. It’s easy to miss, but definitely would be enough to stock Santa’s sleigh.

The first floor of Gimbels includes makeup counters (where Buddy gets sprayed with perfume) and mannequins in the windows. One window has a present that Buddy can rest his head on if he wants to sleep there and get found by his father Walter in the morning.

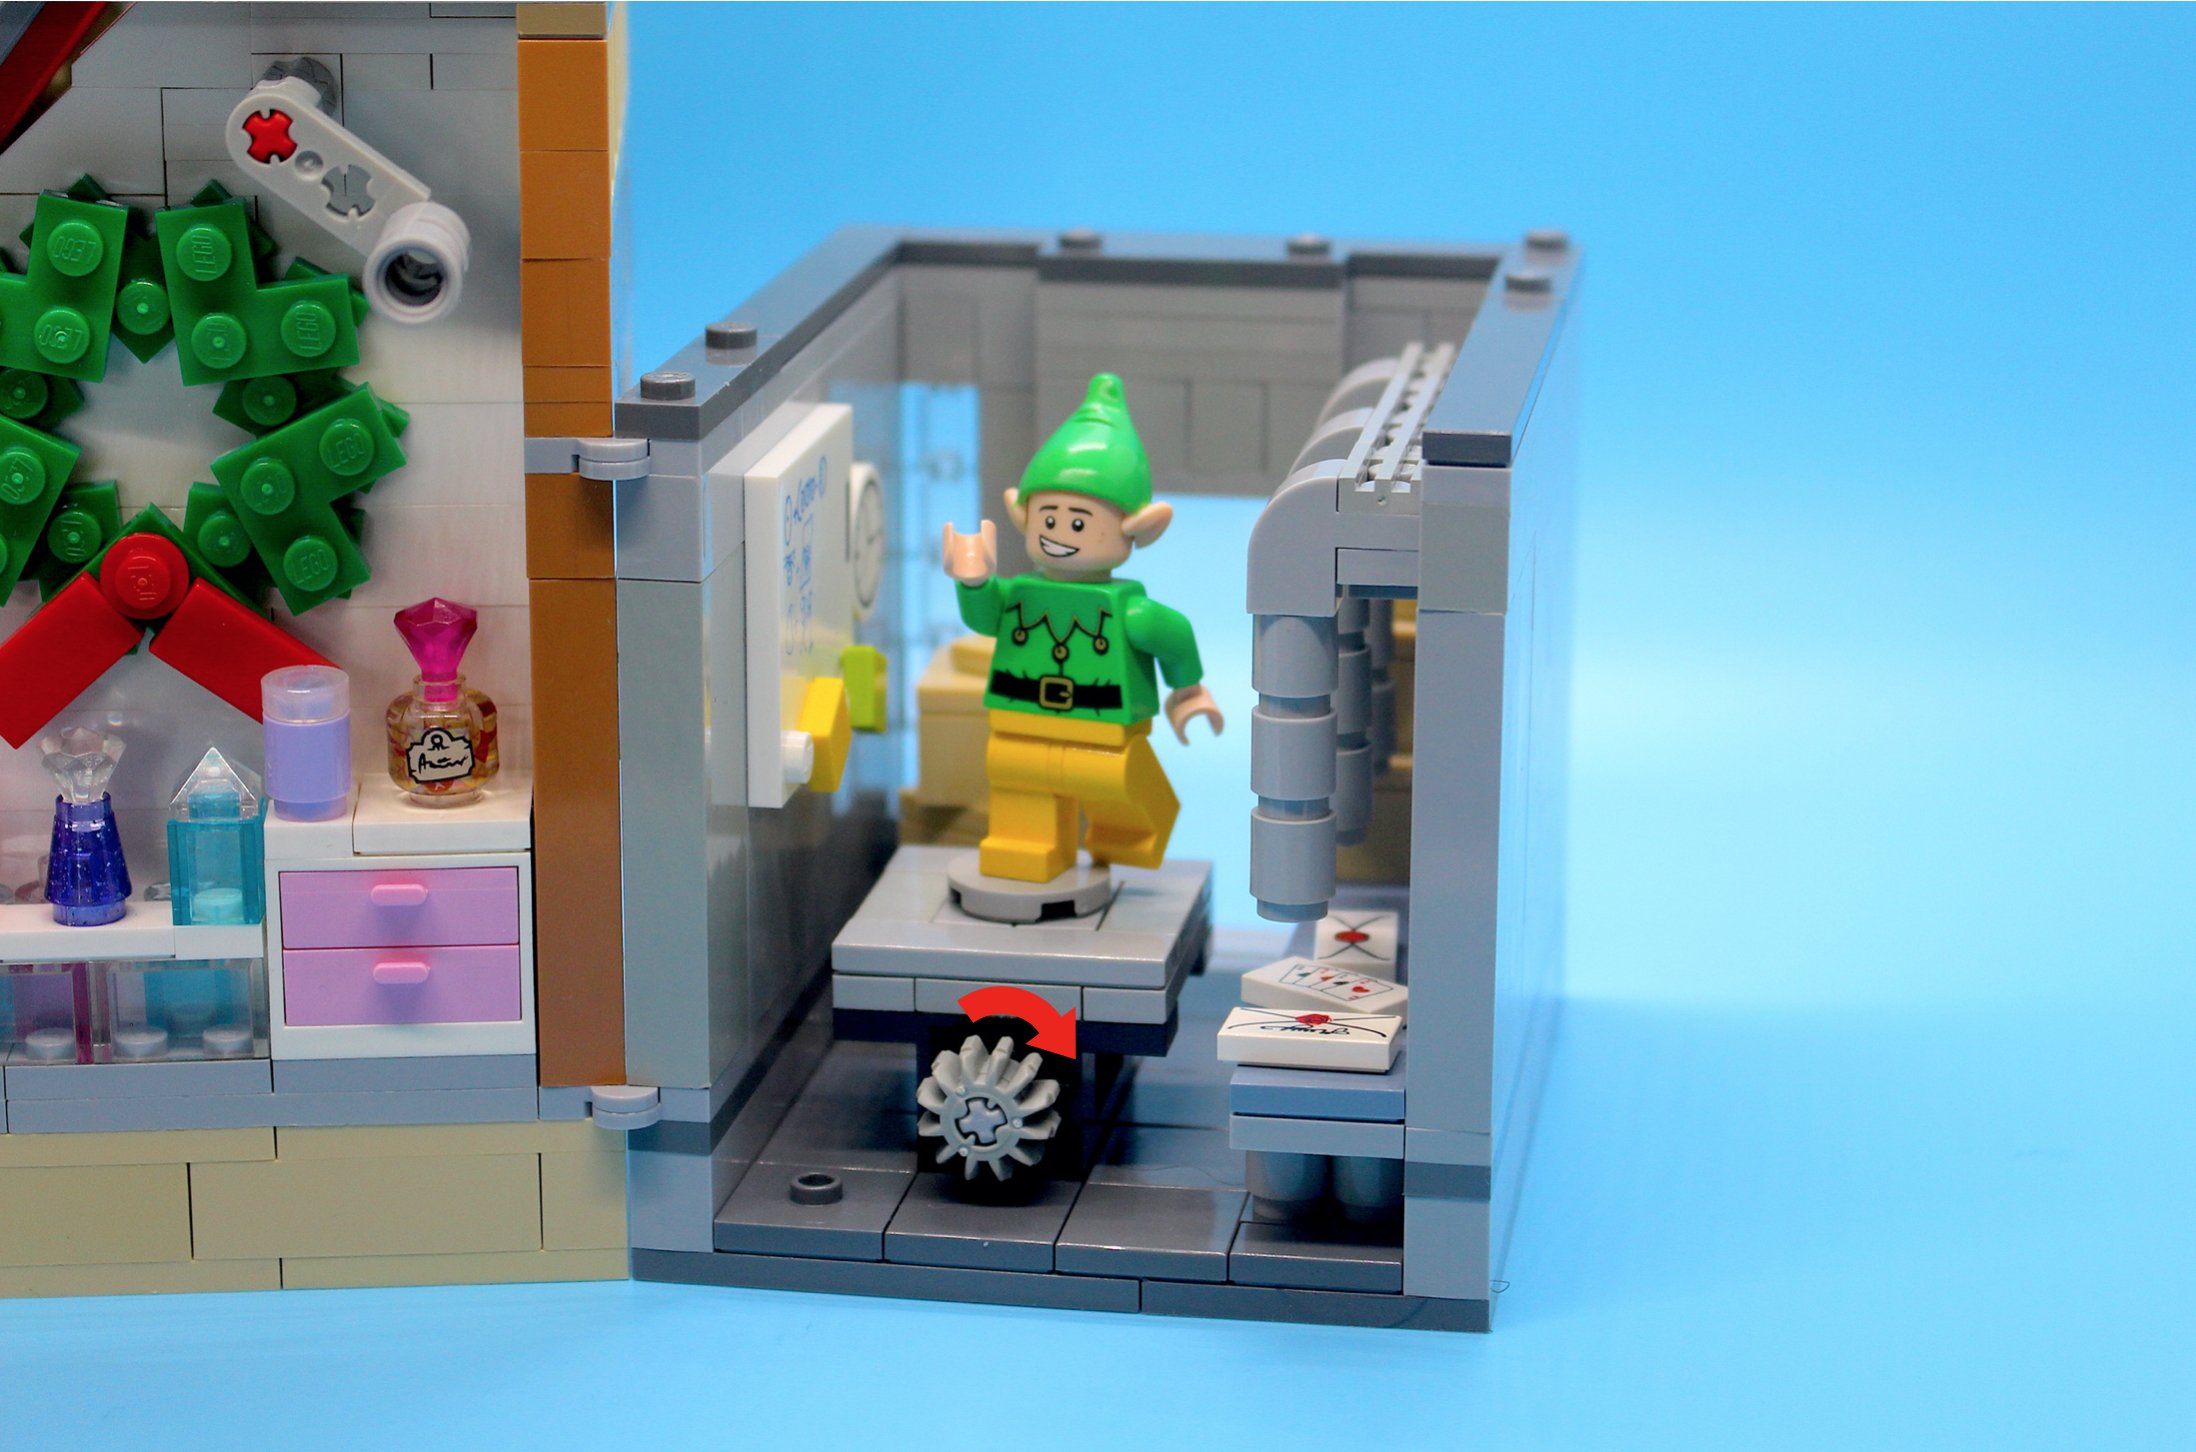
In the Empire State Building, my favorite function is in the mail room on the first floor. It has a table with a spinning top where Buddy can dance for all the mail room employees. It also has little tubes for mail, plenty of letters, plus a clock and whiteboard.

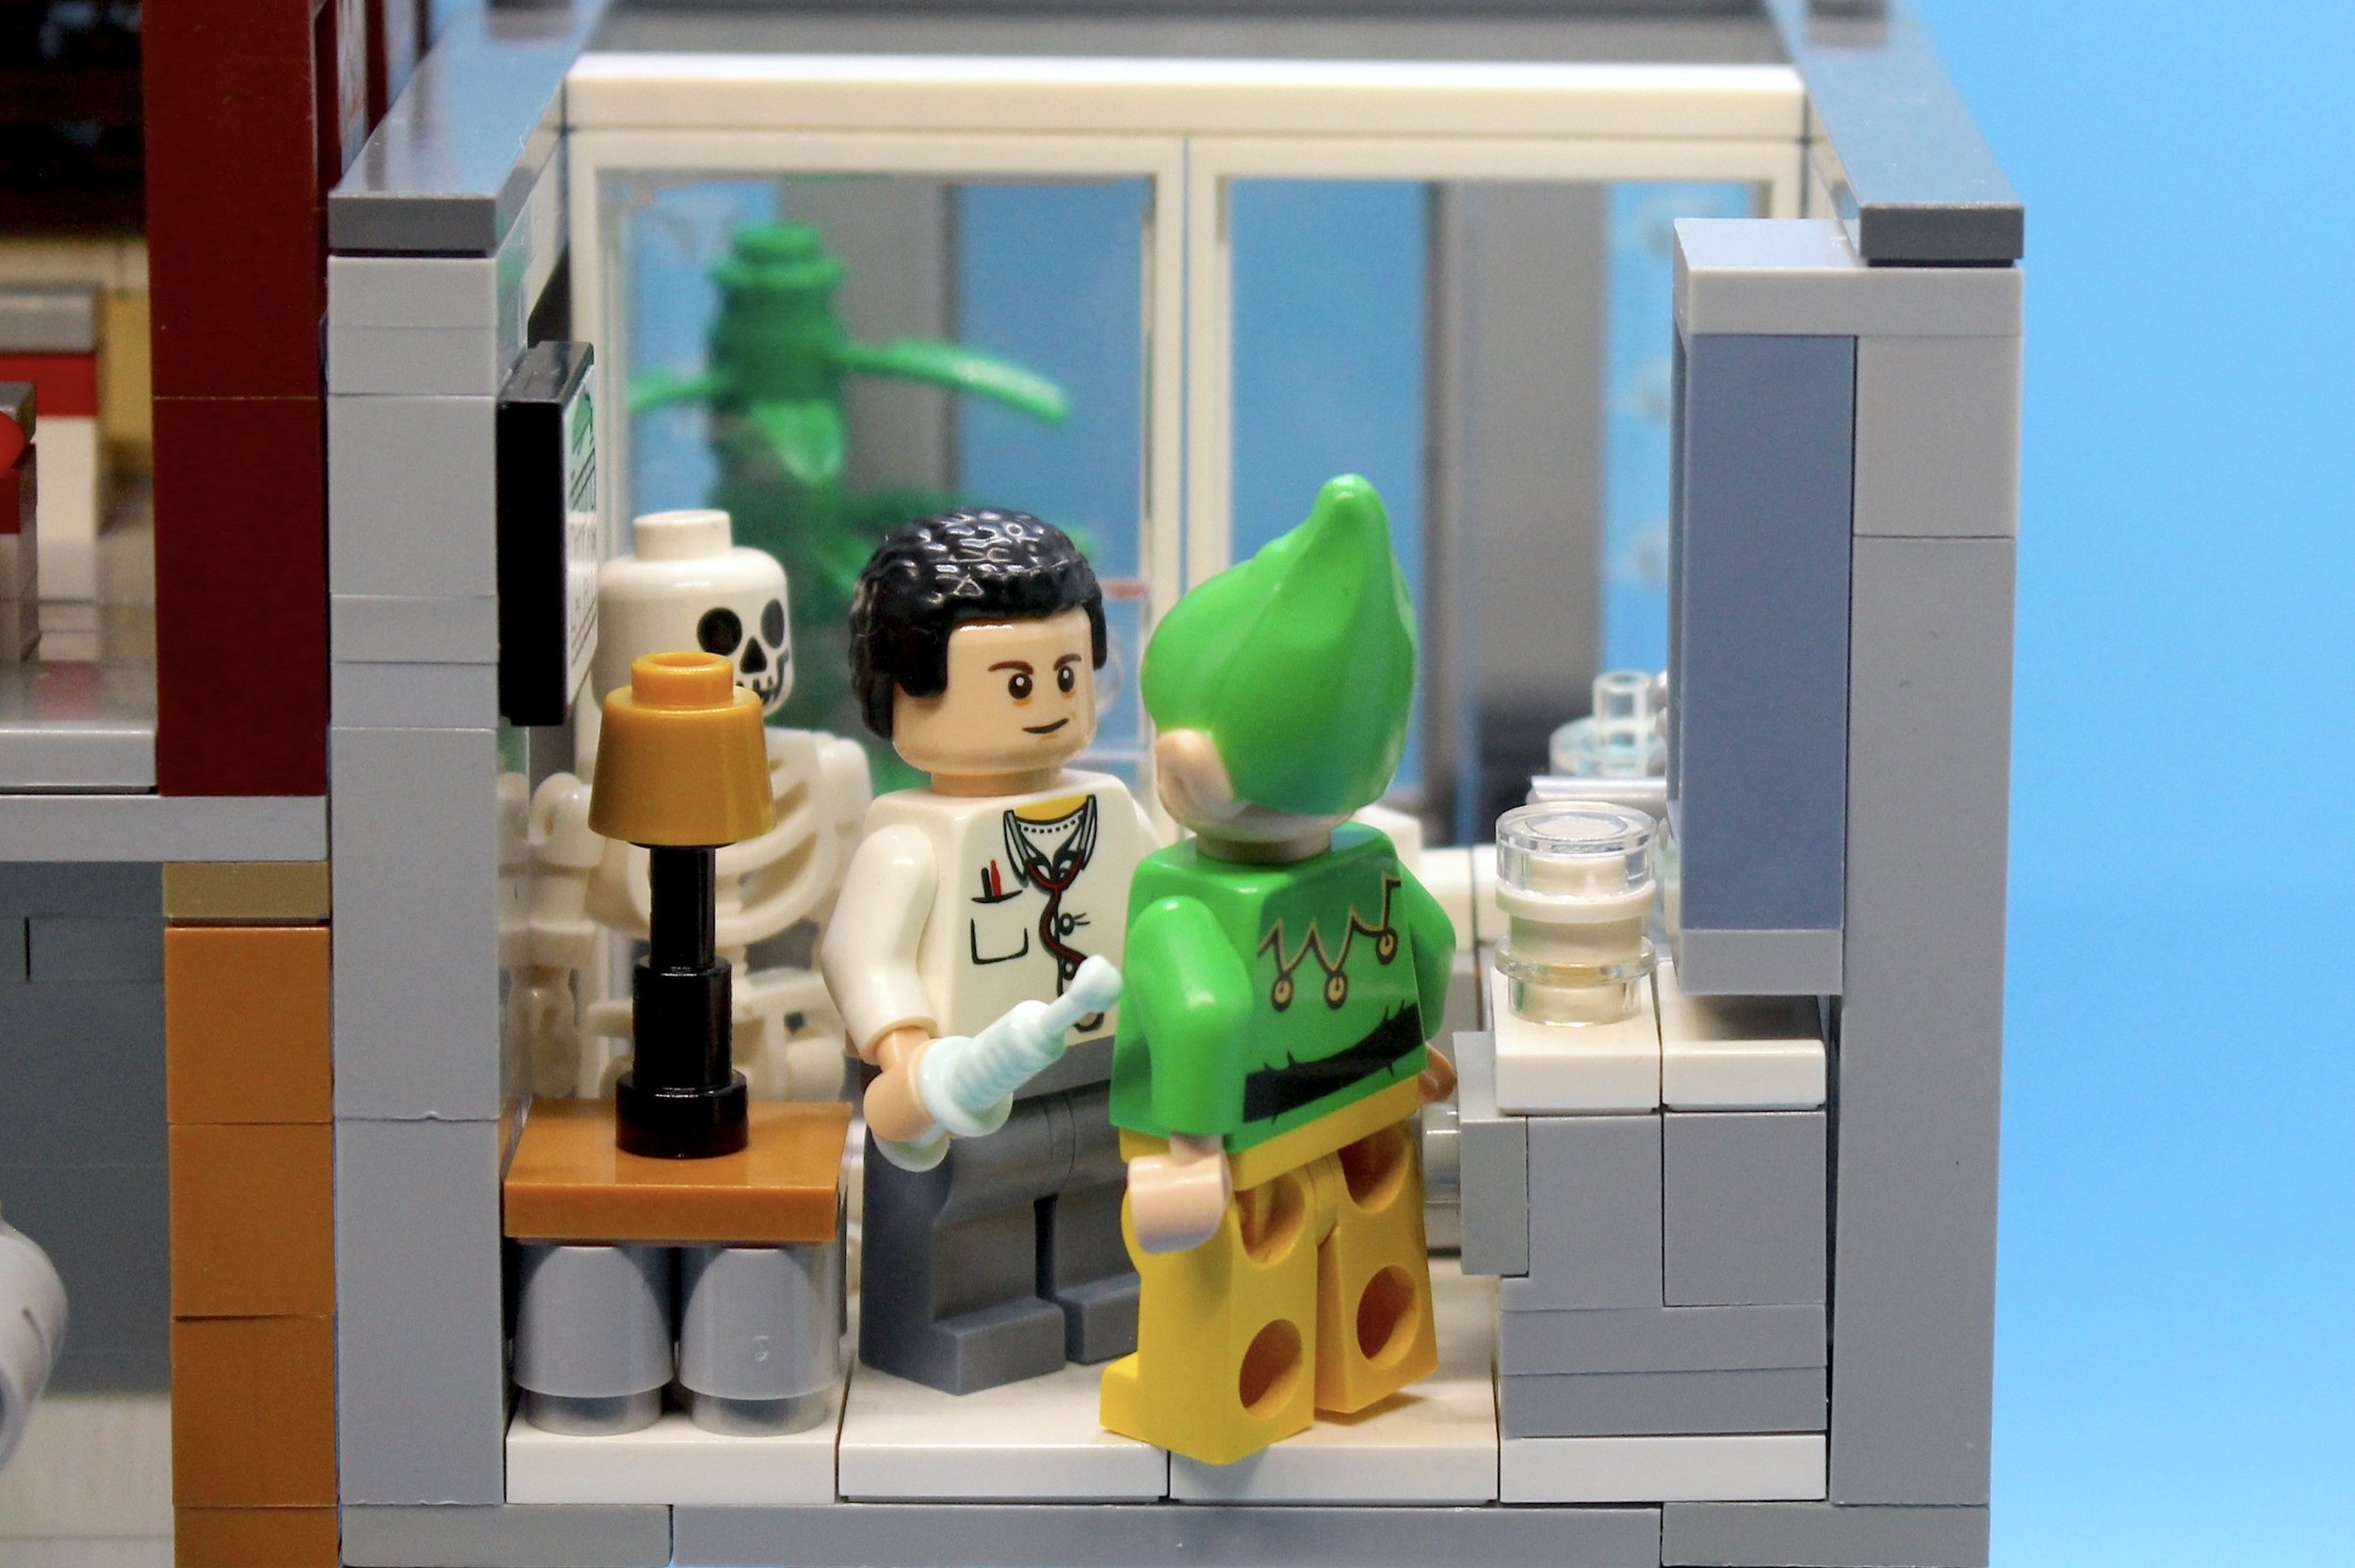
The second story has the doctor’s office where Buddy gets a shot, and where Walter finds out he’s really his son. The doctor is there (played by the director Jon Favreau) and there’s a life-size skeleton as featured in the movie. This floor is split in two, with the back half being the waiting room where Buddy sits next to the small girl and eats a cotton ball (I made sure to include a little jar of cotton balls in the office).

Finally, in the top floor of the skyscraper is the conference room for Walter’s company, where famous children’s author Miles Finch gives advice on their new book. Miles doesn’t take too kindly to Buddy calling him an elf, and you can re-enact this scene on the long conference room table. A fun part of this section was the back desk, which was built using SNOT techniques and several sideways-facing plates to get the right color and texture.

2. DESIGNING THE EXTERIOR

The exterior had some unique challenges, namely the nutcracker balloon! It was difficult to build a small character out of bricks that could hang from a building AND resemble a cartoon form. Thanks to plenty of rounded elements for the arms and legs, it came together at a pretty good scale. My favorite touch is the Batarang for his mustache!

Because the buildings are modular, I wanted each floor to have its own defining features, especially for Gimbels. The bottom story has big white awnings using unique rounded elements, and snow-bound steps with gold tiles. The revolving door uses a tri-pronged Technic piece and translucent bricks; it was tricky to get the Technic axle coming up from the floor and be flush with the rest of the floor, so the door can spin! But I needed to have that scene of Buddy going round and round in the revolving door!

The top floor has plenty of windows to let in natural light, but also a massive bow wrapped around the building! The bow is one of my favorite constructions of the exterior, using a simple combination of curved tiles and rounded plates/tiles to create something I think looks quite a bit like the real thing.

Of course, the top of the building wouldn’t be complete without a Sleighpad for Santa. While it’s not a component of the movie, I knew I wanted a place for Santa to land because his sleigh felt like a must-have vehicle for the set. So I tiled off an “S” on the top, instead of an “H,” letting Santa know where to land. There’s also a chimney that Santa can pose in on top, though it doesn’t lead down into the building..!

Outside Gimbels, I built a little snow-frosted tree and grounds for Michael to play in. There’s a snowball catapult where Buddy can launch snowballs with Michael at rapid speed. Some ice cream cones are stacked in the background to look like Buddy’s piles on piles of snowballs.

Moving on to the Empire State Building, I wanted the exterior to evoke a towering skyscraper while still keeping the modular feel. I included just one large window on the front of each story, to let light in, and added lines of silver and translucent along the sides to create a sense of verticality. For the top, a relatively simple SNOT construction achieved the iconic Empire State look— sans King Kong! The top used to be taller, but I shortened it for a more balanced height differential between the two buildings.

I think the two buildings pair nicely together: the long and short department store, with the tall and skinny skyscraper. Gimbels has bright colors and warmer tones, offset by the Empire State’s sleek silvers. Santa’s Sleigh perched on top of Gimbels adds more height and color to that building, which I think is a great way to display the set. Gimbels has two stories, while the Empire State has three, and each has a removable roof. Each layer is attached by a few studs, just like the LEGO modular sets (which I referenced while building this!)

3. DESIGNING THE MINIFIGURES

I knew the minifigs would be an essential part of this set, and that I had to design them entirely using existing LEGO bricks! While some sacrifices had to be made, overall I am happy with how they came out. Buddy is achieved using holiday elf garb that was already available, plus a LEGO Friends elf hat. I would love it if there was an element with the hair too (and without the ears), that would be perfect! His big smiley face is the same face I use for my sig fig.

Jovie has a custom Christmas sweater on, and a (expensive!) red skirt. I would love to see her with an elf hat on too, but there wasn’t an element with the right look. Maybe if the set gets made one day, that could happen! I also had a lot of fun with the Miles Finch minifig using Aragorn’s stern bearded face. A fun crossover between fantasy actors, with Peter Dinklage of course being the star of Game of Thrones! Fake Santa was also fun — I used Draco Malfoy’s face (I had forgotten that Fake Santa is decidedly clean-shaven) and a nutcracker torso to make him just off from the actual Santa torso.

I think the Doctor also came out well, using Sheldon from Big Bang Theory’s head and the right curly hair piece for Jon Favreau. Walter was an especially tricky one with the elements available, but I think the chiseled jaw face from an old Spiderman set did the trick. The hair could be a bit curlier/thinner, but none of the potential elements came in the right color.

All the minifigures in the set (9) are as follows: Buddy the Elf, Jovie, Walter, Michael, “Fake” Santa, Gimbels Manager, Dr. Leonardo, Santa Claus, Miles Finch.

4. PLAY FEATURES

Many of the play features have been discussed already, but I wanted to put them all in one place (just like I used to pore over in LEGO Magazines as a kid!)

  • Take Buddy up the fully-functioning escalator

  • Dance in the mailroom with the spinning table function

  • Catapult snowballs with Michael outside

  • Make miniature "LEGO" skyscrapers tumble apart

  • Land Santa’s sleigh on the Sleighpad on the roof.

  • Spin through the revolving doors of the department store

5. LEGO IDEAS

As mentioned before, this is my first-ever LEGO IDEAS product attempt, and I wanted to make the set design as playable and fun as all my favorite sets growing up. This set would be a super-fun holiday gift for families that love “Elf,” which has become a modern day classic.

If you’d like to see ELF become a real-life LEGO set, please consider supporting the set on LEGO IDEAS here! Thanks so much for reading, and hopefully this set will make its way to shelves one day! Come spread Christmas cheer and sing loud for all to hear with Buddy, Jovie and the whole gang!

Middle Earth Map: Build Breakdown

In 2023, I set out to create one build to rule them all (at least, bigger than any project I’d done before): a microscale map of Middle-Earth depicting every major location from the film trilogy. After the miniature locations were complete — read more on that here — the next task was upon me: building a 3-D map out of bricks.

The finished map — read on to learn how it was made!

SETTING THE SCALE

When it came to getting the map’s scale right, I had to go to the only reference source I could think of: an old poster of Middle-Earth that used to be hanging in my room. When I had finished all 19 of the miniature locations, I was praying they would all fit within the size of that poster — then I could just build the map in the same scale as the poster!

So I laid out the poster on the floor, and started to pile the mini builds onto it, roughly correlated with their location on the map (making some sacrifices for space) — and it pretty much worked! My LEGO map would need to be slightly bigger than the poster, but it was a close enough fit that I could work with it. I started to mock up the Misty Mountains shape, the coastline, and even the lettering reading Middle-Earth.

BUILDING THE MAP

From the outset, I knew I wanted the brick-built map to be sideways-facing bricks, giving it a smooth surface and using slightly less bricks than if the whole thing was tiled. However, building this way means a LOT of thought needs to go into planning, because making any changes requires taking apart huge chunks of the entire build.

I quickly realized that the coastline would need to be built as sideways-facing plates, staggered to create the illusion of a curve. This would allow me to place dark tan on one side of the coast (representing water) and tan on the other side (representing land). This line was one of the first parts of the map that I built, as I knew I’d have to build out from that shape on either side. There are a couple tricky sections where I had to switch the direction of the bricks from sideways to up and down at the top and bottom of the coast.

The next challenge was the geographical features: rivers and mountains, some of which are quite famous in Tolkien lore. I initially thought I could capture all of these with the same plate line technique as the coast, but I quickly realized that I would have almost no ability to edit my work with that technique, as every line would be instantly baked into the rest of the build. So I decided to have the mountains jutting out from the map using cheese slopes and a SNOT technique, so I could shift them around at will. It would also give the map more of a topographical look. The rivers, meanwhile, would be black flex tube, and would only need to be locked in at anchor points on either end.

I started with the curved S-shape of the Misty Mountains, the largest and most iconic mountain range in Middle-Earth. That became almost a mid-line in the map, and I was able to space out the mini locations to the left and right of it. I didn’t have nearly enough flex tube for all the rivers, so I initially just left clip anchor points and hoped I measured the right length for the Bricklink order!

Then came the sections where the mini locations were supposed to go. I always figured the locations would be attached by a single SNOT (studs-not-on-top) brick, and started out by just layering those into the map in the same tan colors I was using for everything. But I quickly realized two things: 1) I would just be guessing where to put the locations every time if it’s all the same color, and 2) I was going to run out of tan bricks, FAST. Luckily, there was an easy solution: build a rectangular section for each mini location that’s exactly the same size as its base, and do each one in a different color from the rest of the map with the bricks I had available. So, I ended up with a medley of mostly earth-toned rectangles that signaled where to put each mini location. I tried at first to color-code the rectangles according to an arbitrary system (good vs evil places?) but ended up just making it work with whatever parts I had — there are thousands of bricks in this base, and I didn’t want to spend a fortune on sections not meant to be seen other than on this blog!

ARRANGING THE LOCATIONS

As a hardcore Tolkien fan, I wanted to do the best I could to honor the layout of the original map; after all, Middle-Earth is a major character of the Lord of the Rings story, and one does not simply walk into Mordor.

That being said, I also told myself that this map exists as an entirely different artistic medium with its own set of constraints (size and cost being major ones!) so I knew I had to make some sacrifices. For example, Moria had to go east of the Argonath, when really it should be northwest. Lothlorien and Helm’s Deep are too far north, Bree is too far south, etc — so for the strict Tolkien map enthusiasts out there, I definitely know my map shouldn’t be taken for accuracy! But for me, it was important to just have every location represented on the map in roughly the right areas where you could follow the journey of the Ringbearer and the Fellowship, and also have a balanced aesthetic layout where all the locations were somewhat evenly spaced across the brick-built platform.

Something that I think worked out well in the arranging of the locations was that it had a nicely even layout of green across the landscape: The Shire, Fangorn Forest, and Lothlorien each bring green to their respective corners. It also very clearly shows that Frodo’s walk was anything but simple: the Shire is on the upper left-hand side of the map, and Mordor is on the lower right-hand side! The locations also clearly get more sinister in design and color palette as you move closer to Mordor, in keeping with the story. I also included some shout-outs to The Hobbit as well, even though this map is in tribute to the Lord of the Rings: I have a tiny Lonely Mountain parchment tile in its fitting place on the map, as well as a Mirkwood Forest tile (both from a Hobbit set!) I thought these call-outs would be fun for those who noticed, and sure enough someone did call out “The Lonely Parchment,” ha!

BUILDING ON A DEADLINE

I was already well into this project when I learned that there was a LEGO IDEAS Lord of the Rings contest; I knew I had to submit to it, being the massive LOTR x LEGO fan I am. But I learned about the contest a week before the deadline, and I hadn’t built ANY of the map yet! So I worked every hour I could spare on finishing the mini-builds between my day job, and then in the last weekend before the deadline, I stayed up into the late hours of the night to crank out the actual map section. I was throwing every brick I could at this thing just to get it done, and ended up submitting it at 2:30am, when the deadline was 3am! I was really proud to have finished a version of the map, and loved seeing the positive response online. It didn’t win the competition, but I was so happy to have contributed to an official LEGO contest recognizing LOTR — I’d been waiting for them to re-start the theme for 10 long years, and I hope this is a sign of more to come!

THE PROPS

Partway through building the mini locations I realized that I wanted to create life-sized props scattered around the map, like it’s in Bilbo’s Study. It felt like a great way to pair microscale building with 1x1 scale building, with the map itself as a bridge between the two! The first prop I tackled was the Red Book of Westmarch, the fictional version of “The Hobbit” and “The Lord of the Rings” books written by Bilbo and Frodo respectively. I styled it after the official LEGO pop-up book (more on that function in a second) and my favorite part is the brick-built “B” lettering on the cover in the same style that the Master Builders use at LEGOLAND.

I also had to include the iconic sword Sting, which has a very unique curvature to the blade that was an interesting challenge in brick form. I built the hilt using silver tooth pieces to create the look of Elven threads of silver wrapping around. I definitely built this sword for looks and not function; sadly it would not hold up very well to being swung at Orcs!

A late addition was Bilbo’s pipe, which is almost always sure to be smoked with the finest Longbottom Leaf in the South Farthing. I created the curved handle using flex tube and 1x1 round bricks stacked on top of each other; it actually is quite strong, and unlike Sting, it can hold up to being held on the doorstep of Bag End! It also has some translucent bricks creating the effect of residual puffs of smoke. Next to the pipe I placed an inkwell and feather-tipped pen — the pen in particular was a fun challenge using mostly wedge plates carefully constructed so they never needed more than two plate layers for stability.

Finally, of COURSE I had to build a replica of the One Ring, complete with its chain. I purposefully built it with some white brackets to look like the gold is shimmering in the light.

A HOBBIT’S POP-UP BOOK

After I decided to build the Red Book of Westmarch based on the Pop-up Book set, I initially thought the mini locations I had already built could be placed inside the book for an alternate presentation. However this was tricky to do while displaying the map at conventions at events, and many people wanted to see what was inside the book — to which I had to say “nothing”! So I decided to build a page design on the interior, based on Tolkien’s famous “Doors of Durin” drawing in the Fellowship of the Ring novel: the entrance to Moria. I also included a page of brick “text.” The Doors of Durin was one of the most complicated designs I’ve ever attempted, with plates and tiles switching angles constantly throughout to create the thin and curved lines. It was inspired by LEGO sign work I had seen at LEGOLAND California.

BRICKWORLD

I had the great opportunity to reveal this build to the world at Brickworld 2023, where it was met with such a wonderful reception. I put out a sign that encouraged attendees to ask the builder for trivia, and I was surprised how many brave souls were willing to take on the challenge!

I mostly asked people to name every mini location on the map, which is not necessarily an easy task on the spot even for a Tolkien aficionado. If people got that right, they automatically won a small brick-built LOTR prize I made multiples of before the convention. There were a few brave trivia masters who wanted to take on the hard questions, which I very excitedly doled out, and if they got those right, I had two grand prizes for the taking: a LEGO life-sized One Ring, and a miniature Oliphaunt just like on the Minas Tirith micro-build.

After an amazing weekend, the build was awarded with the “Best Micro-Scale” award at the convention, which was completely unexpected and exciting. Seeing as this is the largest LEGO convention in the world, I certainly never went into it with any expectation of winning an award. It was so wonderful to bring a project that was personal to me and reflected the passion I had for my favorite fictional world, and I was so happy to share it with other fans who got to enjoy it as well. I met someone who had charted the entire genealogy of every family in Tolkien’s universe, and someone who was a linguistic consultant for the Tolkien Estate. How awesome to find other people with the same cross-section of (super nerdy) fandoms! One family I met — grand-prize trivia winners! — watched the film trilogy every year just like me.

LIGHTING MIDDLE-EARTH

A new challenge I took upon myself for this build — mostly to showcase at Brickworld — was to fully light it using third-party LEGO-compatible lights. I strung them through the build, trying to tactfully pick the locations. Lighting the beacons of Minas Tirith and Edoras was a no-brainer, as well as giving Minas Morgul an eerie neon glow. Mount Doom was already built with a light brick, and the Eye of Sauron needed to be casting light on all of Middle-Earth. Lothlorien was a late decision to light up, but possibly the best: as one of the tallest and most uniquely-shaped builds, it definitely deserved the light that would naturally be given to it by the Lady of the Wood.

I initially had planned a green glow coming from the Dead Marshes, but instead hoped the glow in the dark bricks under the water would do their job, and instead gave the green light to Fangorn Forest, to make another of my favorite locations pop. Finally, I included a blue light for the Doors of Durin (this required caving out the build and making two different sections behind the door, a light-up one and regular one.) I added a small orange light underneath in the Mines as well, to hopefully draw the eye to the Balrog and the bridge of Khazad-Dum which were a bit easy to lose in the daytime.

I really loved seeing the whole map light up when the lights went dark during “World of Lights” at Brickworld; it created a new dimension to the map and I found myself wanting to get down on eye-level with it and track the way the light bounced off all the locations. It was certainly tough to light the build with all the tiny cords (and trying to hide them in the build!) but definitely worth it in the end.


This was an extremely special and personal project that I loved creating this year. It makes a difference to build something you’re truly passionate about, and so far has been endlessly rewarding to share that with the world. Thanks for reading, and I hope you enjoyed the journey through Middle-Earth.

Micro Middle-Earth: The Adventure Begins

In 2023, I set out to create one build to rule them all (at least, bigger than any project I’d done before): a microscale map of Middle-Earth depicting every major location from the film trilogy. Follow along the journey of creating each microscale location!

The Lord of the Rings films by Peter Jackson are easily my favorite of all time. I had been toying with the idea of a massive LOTR-themed build for some time, but wanted to do something in my wheelhouse. Giant LOTR dioramas have been done to amazing effect by other builders, so I decided to focus my project around microscale vignettes that capture all the essential details of the locations I love.

I was inspired by the LEGO Lord of the Rings video game and its open-world map that really helped me learn the geography of Middle-Earth. I loved how the style, culture, and mood changed as you journeyed across the landscape, and I wanted to capture that feeling in these micro-builds. In true Tolkien fashion, it all had to start in one place: in a hole in the ground, where there lived a hobbit.

1. HOBBITON & BAG END

This micro-build started with the most famous feature of a hobbit hole: the round door. I wanted the iconic green door of Bag End to pop against the mostly-green surroundings, so I knew it had to be framed by another round plate (in medium nougat), accompanied by the English cottage-style trappings of the Shire. I had fun with the stairway leading up to Bag End built with jumper plates, and the little gate outside with no admittance except on party business. The trickiest part was creating the slope on the left side of the hill. It took some engineering to get a chunk of the hill attached to clips that could slant down, yet still blend with the rest of the hillside. Overall I am very happy with the look of this build and its recognizability — however the size of the Hobbit door I settled on made it not quite in keeping with the “microscale” of the rest of the vignettes; it’s a little large for the little folk of the Shire!

2. BREE

Getting the Tudor-style buildings to have the right lines and style was a fun challenge in this one, mostly achieved by brackets. This build also includes a little shout-out to my favorite cameo in the series — Peter Jackson eating a carrot, represented by a single orange stud!

3. WEATHERTOP

In this build I went all-in on some curved wedge slopes I happened to have a lot of; they created the sharp, ruined look of this abandoned watchtower. I also decided to include some Nazgul on the platform with a flame. The smallest of the vignettes, but a necessary location!

4. RIVENDELL

This was one of the earliest microscale LOTR projects I attempted, well before I came up with the idea for the map! In fact, it was one of the builds I was working on right before Lauren & I went to be on LEGO Masters. I re-did some of it for this project, trying to capture the right blend of colors for the foliage and cascading waterfalls. Even though it has some traces of an older building style than I have now (like the not-so-hidden “big ugly rock pieces”) I think it carries the spirit of the Last Homely House!

5. THE MINES OF MORIA

Moria was by far the most difficult location of the series to make in microscale. I knew I wanted the Doors of Durin, and that idea crystallized when I started messing around with translucent cheese slopes at different angles to create the door’s design. I then included the tentacles of the sea creature in the water (at first it had a lot more, but ended up looking too busy!) To top it off I made some gnarled trees to frame the doors, using Harry Potter wands and minifig hands as branches. Then…a whole month later I decided to add the Mines below — it just felt like it was missing something (only the namesake of the entire location!) I included the Bridge of Khazad-Dum and a microscale Balrog with a Batarang as his wings. Tiny Gandalf is perched on the bridge to tell him he shall not pass. Seeing as this location doesn’t have an iconic structure, it’s probably the hardest to identify at first, but if you look at the details hopefully it’s recognizable!

6. LOTHLORIEN

This was the location that kicked off the map project; originally I wanted to just have three microscale LOTR builds of the last Elven realms on Middle-Earth: Rivendell, Lothlorien, the Grey Havens. But I loved building this so much that I had to keep going. I had been wanting to use a spiral of jumper plates in a build for a while, and the spiral stairways leading to the treetop flets felt like the right place for it. The build also includes Galadriel’s mirror at the base of the mallorn trees! I oscillated on the color of the trees, seeing as this is the “Golden Wood,” but decided to stick to more classic colors as it seemed to more closely match the films. This ended up being one of my favorite builds of the series.

7. THE ARGONATH

This was my first attempt at building a replica of a Middle-Earth location, three years ago at the time of this writing! I had always loved the Argonath sequence the most out of all the movies, and was always disappointed it never got an official set, so I had to make one myself! The original iteration was much more clunky in the rock work, using whatever pieces I had available in tan at the time. I decided to re-do the build for this project, keeping the statues almost exactly the same but changing the rocks to dark tan and making them cleaner sloped builds. A last-minute addition were the trees along the rim, which gave a pop of color and life to the build.

8. THE DEAD MARSHES

I had a plan for this build from the outset: to use translucent window pieces as the water that you can peer into and see the bones below the surface. I included some glow-in-the-dark pieces as well: “don’t follow the lights!” It was a good challenge to make the fell beast searching for the Ring from the skies — it’s built using only 7 pieces!

9. ISENGARD & ORTHANC TOWER

One of my favorites of the series, this is a relatively simple build and I was happy with the clean results. The sides of the tower are positioned on hinges to get that subtle slope, and the top section is built using an octagonal round piece with bars. At the base of the tower, I tried to create cracks in the ground showing the fires underneath, and capture the “metal and wheels” of Isengard on the now-barren landscape.

10. EDORAS & THE GOLDEN HALL

This build I had created before the map project as well; it was the first build I did after returning from LEGO Masters, and I remember being so happy to work with microscale detail again and not have to focus on massive structures, ha! For this map project, I added the mountain in the background with the beacons of Gondor lit. It was inspired by the Tokyo Skyline official set, and I was happy with how it added forced perspective depth to the model! This model was inspired by @benbuildslego on Instagram, whose skylines I also used as inspiration for Minas Tirith.

11. FANGORN FOREST

Another favorite in the bunch, I really loved building the microscale Ents! I made each one slightly different — one has a creeping vine as an arm, another has different foliage sprouting as its hair. I imagine Treebeard to be the one out in front, leading the Last March of the Ents!

12. OSGILIATH

An important historical location for Middle-Earth, and one much more featured in the movies than the books! It was an interesting challenge to create the ruined city of Gondor in microscale; at first I went crazy with tiny details, using every weirdly-shaped light bluish gray piece I could find. But then I realized I needed to make the structures about twice as big to match the scale of the other micro-builds — and it’s still a bit on the small side! I really like how the domed buildings came out, and this was another perfect place to include a fell beast flying overhead.

13. HELM’S DEEP

The spot of one of the best battle scenes ever put on film deserved one of the best micro-builds, so I really put my all into this one! It came together pretty quickly and easily, and I was happy with the result. I think at a glance, this might be the most accurate of the builds at this scale compared to the film. I made sure to include the sloped ramp coming down from the front gate, and it’s built into a ravine just like the actual location. I tried to add some ladders and machines of war to the battlefield at first, but I think it just cluttered the overall look, so I decided to take Gimli’s axe to them.

14. MINAS MORGUL

One of the most interesting stylistic creations for the film with its harsh angles and deathly glow, Minas Morgul definitely needed translucent pieces to distinguish the “dead city” and home of the Nazgul. It ended up coming together with a pretty simple construction of an octagonal bar piece with wedge plates clipped to it all around. The bridge was a fun addition, falling off into an abyss of translucent green. The structures are getting more sinister as we simply walk into Mordor!

15. MINAS TIRITH

Unlike its dead sister city, Minas Tirith is still clinging to life with the pride of Gondor. The most important part of this build was its unmistakable curved tiers, and large promontory of rock jutting out from the center. These were captured extremely well in a skyline by @benbuildslego, so I adopted a similar technique here. For the map project, I added an Oliphaunt charging across the Pelennor fields, which took many iterations to get right at this scale!

16. CIRITH UNGOL

A location name possibly more known to hardcore fans, this pass is also the home of the great spider Shelob, whose lair is a big part of this mini-build! It also includes the winding stair that Gollum leads Frodo and Sam to. The build has a feature where you can pull away the top of Shelob’s lair to reveal her webs within; it also has a little 1x1 round tile depicting Frodo ensnared in her web!

17. MOUNT DOOM

Here at the end of all things is a great mountain of fire — and one of the more challenging micro-builds! I realized I struggle with creating realistic-looking rock forms, and I had to do this build over completely to get the scale right. It has a little entranceway to the lava pit, as seen in the films, and the mountain is bursting fire from its summit. I included almost every translucent red and orange piece I owned for this build, and it also has a little red light brick inside to create the lava glow!

18. THE GREY HAVENS

The story concludes with my favorite microscale location to build: the Grey Havens on the shores of Middle-Earth. The plate-built sunset of yellows and oranges was a really important part for me to capture, and I also included some of those colors in the water to look like they’re reflected. I used a very intricate stair technique I saw in the Trafalgar Square official set, plus plenty of foliage in the foreground, which is intentionally larger. In the background are tiny towers perched in the mountains going off to the distance, which are smaller for the forced perspective illusion, plus the tiny boat sailing off to the Undying Lands.

Puppet Masters - Episode 8 Breakdown - LEGO Masters

In the summer of 2021, my sister Lauren and I appeared on the second season of LEGO Masters on FOX. These breakdowns delve into each episode and talk about the process behind the build, the challenges Lauren and I faced, and the stories of our finished products.

In episode 8, we saw that giant puppet theater on-set and didn’t think it was LEGO. Then we saw the little edges of bricks, and were blown away! When Will Puppette entered the scene, immediately we knew what we were building. Puppets! Another absolutely insane thing we never could’ve imagined we would build out of LEGO.

Screen Shot 2021-08-18 at 11.47.31 AM.png
Screen Shot 2021-08-18 at 10.45.28 AM.png

Lauren and I used to put on puppet shows for our parents as kids--the home videos are classic. Our rinky-dink stage setup used to collapse on top of us while we were performing, so we were hoping this one wouldn’t do the same! Admittedly we hadn’t put on a puppet show for a really long time, so this was going to be interesting. It was really cool to learn who was behind Will Puppette--Steve Whitmire, one of the voices of Kermit the Frog! Steven knew who he was immediately, and we were all really impressed when we found out. He was such a nice guy, and really generous in his attitude and the energy he brought to set. You could tell Will loved working with him--he just seemed to be having so much fun doing full-on improv with an experienced pro. Will even called his son to say hi to Will Puppette on set.

Screen Shot 2021-08-18 at 10.29.56 AM.png

A big component of this challenge was that we had to build with another team. The decision of who to pair with was super easy for us. Michelle and Natalie were our best friends on-set; we were van buddies with them as we were shuttled back and forth at the early (early!!) hours of the morning, and the late nights, so we got to know them really well in a short period of time. They also have a fun, playful build style that we thought would work well with ours. So we teamed up, and got to work!

Very soon after Will and Puppette announced the challenge, I had the idea that we should build our puppy at home, Hazel. She’s a Cavalier King Charles Spaniel with these floppy ears, and an adorable smiling face that we thought would make for a great puppet. To bring even more character into the puppet, we decided to make her a princess--which our dog definitely is at home! She could have a princess crown and a bedazzled collar, and a bejeweled tennis ball perfect for fetching.

Screen Shot 2021-08-18 at 11.47.15 AM.png
Screen Shot 2021-08-18 at 10.30.16 AM.png

The first thing I had to tackle was the mouth of the puppet. I built it using angled Technic liftarms that would slope down and give us a little platform we could press down on to move the mouth up and down. To create Hazel’s adorable, panting face, I built a curved base of her mouth that would make her look like she was always smiling.

While this was happening, Lauren started working on a princess crown using hinges and yellow wedges. The first crown she built was a bit too big; that was a bit of a tense moment when Lauren had to scrap it and build a whole new smaller one!

Screen Shot 2021-08-18 at 10.42.51 AM.png

As the puppet mouth came together, Will and Billy (Will Puppette) came around to say hi. They had this hilarious interaction where they tried to one-up each other with gifts they would give us to be the best host. It started with free lunch, and ended with a private jet to a Hawaiian vacation. Can we cash in on that now, please?

As you see in the episode, they asked what voice we’d be using for the puppet. As my friends could tell you with shame, I’m not shy when it comes to doing my English accent. I grew up watching the Harry Potter movies and wanting to be in that world, and a big part of that is...the accent! So I shamelessly tried it out in front of a famous actor and a famous puppeteer. I personally think it’s not that bad, no matter what they say! For the puppet show, my plan was to use the same voice as Ron Weasley in the Potter Puppet Pals, which are some of my favorite YouTube videos (and very relevant puppet-wise!) I used to read the Harry Potter books in those voices to Lauren to get her excited about them, so doing that voice for the puppet show was a throwback for us.

I moved on to the face of the puppet after Will’s check-in. Our head was quickly becoming quite big, which the judges warned us about for weight. We had learned that bigger always meant better in LEGO Masters, but maybe not for this specific build! One good thing about the bigger sized head was that it allowed us to build really big eyes using white rounded plates (which we had used before for the frosting edges on our cake!) The big head also was really expressive, and we felt that’s how we could create a “lovable” character that the Brickmasters were asking for. We even gave her little eyelashes using black minifigure-sized lever parts!

Movement was another component of this challenge, so to incorporate that, I built Hazel’s ears on spinning axles so they could move freely in the wind, just like a dog’s ears would. Jamie liked the plan, and thought it was a unique way to get organic movement. We tried the same technique with the tongue, attaching it to an axle so it would sway slightly back and forth. With a bit more time, we might’ve figured out a better mechanism to really get that tongue wagging!

Screen Shot 2021-08-18 at 11.25.52 AM.png
Screen Shot 2021-08-18 at 11.33.39 AM.png
Screen Shot 2021-08-18 at 11.19.48 AM.png

Strength was a big thing on my mind for this challenge. We really didn’t want our puppet to break--that seemed like the worst thing that could happen. So we built a really strong spine using Technic bricks that I could hold onto, and be confident that the puppet wouldn’t fall apart. This spine added to the weight as well, but we felt it was a fair tradeoff for strength.

Lauren then got to work on the bedazzled pink collar, which turned out great. She built it using ball joints and sparkly translucent cheese slopes that popped nicely. She also included a pendant attached with chains, which would move with the body of the puppet! While this was happening, I built out the body of the puppet as a thin layer of bricks, trying to incorporate color variation with her white chest, and lighter brown sides. Lauren built the arms using these maneuverable Technic links, and I built the little puppy paws with long sticks for holding the arms up. We wanted to make sure the arms and paws were tiled off to give them that smooth finish.

Finally, Lauren built a little bejeweled tennis ball for Hazel to fetch. She built it in a standard Lowell sphere form, with white lines along the edges and translucent 1x1 plates to give it a “bejeweled” sparkle.

With about 30 minutes left, we had to set some time aside to practice with Natalie and Michelle. We worked out all of the kinks--one of them being that the arms weren’t fastened securely enough!--and got a sense of how our puppets would perform together. One thing was for sure: both of our puppets were going to be heavy.

Screen Shot 2021-08-18 at 11.14.47 AM.png
Screen Shot 2021-08-18 at 11.35.34 AM.png

For the show, we were each provided a script with lines we had to memorize, as Puppet #1 and Puppet #2. The scene involved both puppets introducing themselves, and talking about a VIP “very important puppet” show they had to attend. There was also room for each puppet to show off a “special skill” individually, plus a moment at the end for the puppets to perform something together. Hazel’s special skill was fetching her bejeweled tennis ball! We had Betty Brick throw the ball for Hazel to catch in her wide-open mouth. That got a good laugh from the judges.

For the end performance together, we planned a song with Natalie and Michelle to sing together. Natalie came up with the lyrics, and we had Hazel add a little “woof” at the end of each line. And of course, in the lyrics, we reminded everyone that the plural of LEGO is LEGO! It was so much fun. Honestly, we had no idea that their arm fell off during the show. There was so much going on. Between memorizing lines, operating the puppet, and getting the voice down, I was hyper-focused on what I was doing (there was so much to think about, that at times I forgot to move the puppet’s mouth or make sure the ears were moving!). But overall, we thought it went really well! The puppet was HEAVY, though, like other teams struggled with too. I had to put the puppet down on some wood blocks to rest my arms a couple times during the show. At least they let me take my blazer off! Thank goodness! Just when we thought we were done, we had to perform the show a second time, without the judges or Will there, to use as extra coverage if needed.

Screen Shot 2021-08-18 at 11.38.58 AM.png
Screen Shot 2021-08-18 at 11.48.08 AM.png

When it came time for judging, we had no idea what the judges would think! Every puppet was great, and every puppet had things that the judges wanted to see improvement with. At this stage in the competition, everyone had won a challenge, and we were all just hoping to have that extra something to impress the judges. Regardless, Lauren and I were really proud of our build. It reminded us of home and our cute little pup, and we thought it captured her well. 

When we were in the bottom two with Natalie and Michelle, it was a little comforting. We had done the puppet show with them, and we were in it together. They were our best friends, so at least we got to be in that position with them. 

LM-S2_208_ScElimination_RVM-TG0176_f.jpg

When they called our name to go home, it was a rush of emotions. I barely knew what to say, and was holding back tears, so I’m just happy that what I did say was somewhat coherent! I had tears not of sadness for leaving, but of pride and gratitude for Lauren coming on the show with me and supporting me--this is my lifelong creative hobby and passion, and for her to come along on this ride, and rise to the occasion like this was really amazing. With every build, no matter the challenge, we wanted to tell stories. We hoped to bring fun, lovable characters to life whenever we could, and build fantastical worlds that we wanted to see in LEGO bricks. We hope you enjoyed the builds as you came along on this adventure with us.

IMG_8058.jpeg
Screen Shot 2021-08-18 at 11.46.58 AM.png
Screen Shot 2021-08-18 at 11.49.56 AM.png
Screen Shot 2021-08-18 at 11.06.15 AM.png
Screen Shot 2021-08-18 at 11.18.25 AM.png

Bricking Wind - Episode 7 Breakdown - LEGO Masters

In the summer of 2021, my sister Lauren and I appeared on the second season of LEGO Masters on FOX. These breakdowns delve into each episode and talk about the process behind the build, the challenges Lauren and I faced, and the stories of our finished products.

When we had to put goggles on before we went out on stage for episode 7, we knew something was up. We didn’t expect to get pelted with newspapers blown at us by a giant fan. We picked up a few of the newspapers, and saw they were from 5+ years ago! Who just has those??

Screen Shot 2021-08-11 at 11.33.36 AM.png

When Will introduced the challenge, we were quite honestly confused. What is a “giant centerpiece” that spins in the wind? I was thinking of all the things we could make spin in the wind: a dancer? A spaceship? Then the producers read the rules to us, and we realized we all had to make a windmill. Oh. Not quite as interesting, but we rolled with it!

Screen Shot 2021-08-11 at 11.49.24 AM.png

Lauren and I had been wanting to do an undersea build for quite some time. We grew up going to tide pools in Laguna Beach, and wanted to recreate that rocky, vibrant environment teeming with life. The Little Mermaid is also close to Lauren’s heart, and I liked the opportunity to build fun sea creatures. So we set out to build Tidal Turbine Tango: when a fancy new turbine is placed in their ecosystem, all the creatures in that corner of the ocean gather around it, because they’ve realized that the currents from the turbine are perfect for dancing. I pulled a lot of inspiration from The Little Mermaid ride at Disney California Adventure, which has a big dance party section for “Under the Sea.”

Lauren felt committed to this idea, but I told her that I didn’t think we’d be the only ones to do an underwater build. It just seemed like too much fun to make wind power look like undersea currents. Sure enough, Caleb and Jacob had the same setting! But we were in different oceans, so it was okay.

Together, Lauren and I started by building up the turbine tower. We were no strangers to building a strong tower after our Cake build in episode 3, so we used a very similar technique for this. We used SNOT bricks all along the sides to build out from later on. Lauren then got started on the rocks along the base, intended to look like shallow, rocky tide pools. I meanwhile tried to work on the mechanism for the windmill.

Screen Shot 2021-08-11 at 11.52.42 AM.png

You heard it here first: building a windmill is not as easy as it looks. I’m not an engineer, and know nothing about the physics of a windmill! My first attempt was flat, and it didn’t do anything. The second attempt I added curved slopes to the propellers, and got a little bit of movement. Finally, what did the trick was adding these white, large airplane fin parts that caught the wind really well. I started by placing them on all of the propellers, and it spun super-fast. I realized that it worked better to place the fins on just two propellers, to slow down the spin.

Screen Shot 2021-08-11 at 12.09.29 PM.png

Finally, with the windmill ready and half the time gone, I got to work on the undersea characters, which was the part I was most excited about. I built the seahorses first, using minifigure legs to get the curl on their tails--it was awesome that the brick pit had multi-colored minifig legs! I also angled their bodies using Technic joints to get them tilted backward in a fun dancing pose. Next was the lobster, which I had fun posing like he’s saying “well, what the heck, guess I’m dancing.”

Then the starfish, which was built with a tricky technique I had never tried before, using hinge plates to create a pentagon, and attaching large orange wedges to each side of the pentagon. My favorite part is the mouth, made using quarter round tiles to get his big buck teeth. I built the jellyfish with little hot dogs as their smiling mouths, and long flexible joints for their arms.

Screen Shot 2021-08-11 at 12.08.28 PM.png

With three hours left, Lauren had finished the rocky base and the little rock outcroppings for the characters. She then moved on to creating the fun, moving sea life plants with little neon chains hanging off of them, to catch in the wind. The plants were built using Technic axles and round bricks and plates running through them.

I turned my focus to decorating the white turbine tower. We decided to build “Sammy Squid” hanging on to the tower, writing “Dance Party” on the side in squid-ink graffiti. I built the squid arms with plates and quarter round tiles moving up and around the tower on both sides, and built the wording using purple and black Dots to look like ink.

Screen Shot 2021-08-11 at 11.57.42 AM.png

While this was happening, Lauren added color and kelp to the base of the build, trying to address the judges’ note that our rocks needed more color. This was definitely a problem area for us; while we were always planning to add more color to the build, we definitely stepped it up a notch when the judges gave us that direct note. One thing we struggled with in this challenge was keeping constant communication on how we integrated color: we were strapped for time the whole way, so we each kind of went into our own rhythms and didn’t look as carefully at the composition of the whole to see if adding more color would actually improve the build!

Screen Shot 2021-08-11 at 12.19.58 PM.png

Finally, time was up. When it was time for our windmill to perform, I wasn’t sure if anything would work! We had only tested it up to 17mph with the smaller fans, so it was anyone’s guess as to how the wind would affect the structure.

We were all standing about 20 feet behind our builds while the fan blew them to pieces. I remember someone asking if we should cover our necks for safety--wouldn’t want a sharp plate flying right at us! The producers assured us that they had tested and it would all be fine.

When the fan started up, we immediately saw the little plants and neon chains shaking, but couldn’t really see much else from our vantage point. But, the windmill was working! Will kept bumping it up a notch, further and further. We just didn’t want to be the lowest, which at that point was 20mph. It ended up withstanding 50mph, which we were so happy with!

Screen Shot 2021-08-11 at 12.23.15 PM.png

In the end, this build landed us in the bottom two, mostly for the debate about color. Amy had mentioned that she loved our characters, especially the lobster, which cracked her up, and didn’t want them to get lost in the build with all the other colors. Jamie echoed the same sentiment. While it was nerve-wracking being there, we felt confident in the strength of our structure lasting all the way to 50mph, which was the same strength level as Dave & Richard’s winning build. We were so sad to see Maria & Philip leave--they are amazingly talented builders, and their attention to detail was awesome in everything they created. We had also gotten to know them so well over the course of the show. 

This was our hardest challenge. We felt the creative constraints of us all having to build the same thing, and it was another strength & engineering challenge, which is inherently not something in our wheelhouse as story and character builders. But we survived, and moved on to another episode. And we still got to make some pretty cute undersea characters along the way, that would hopefully make Spongebob, Patrick, Sebastian, and Ariel proud.

Screen Shot 2021-08-11 at 12.18.16 PM.png
Screen Shot 2021-08-11 at 12.18.24 PM.png
Screen Shot 2021-08-11 at 12.31.57 PM.png
Screen Shot 2021-08-11 at 12.20.35 PM.png

Demolition Derby - Episode 6 Breakdown - LEGO Masters

In the summer of 2021, my sister Lauren and I appeared on the second season of LEGO Masters on FOX. These breakdowns delve into each episode and talk about the process behind the build, the challenges Lauren and I faced, and the stories of our finished products.

I loved sports cars in middle school. In 7th grade, I was all about Ferraris--even had a poster of one hanging in my room. While that passion didn’t translate into adulthood, I still thought it was pretty cool to see the lime-green LEGO Lamborghini sitting on a pedestal when we walked onto set. At least, one part of me thought it was cool. The other part thought “I’ve never built a car chassis before. Are we gonna have to build cars from scratch??”

Screen Shot 2021-07-21 at 8.03.22 PM.png

Will let us look at the car for all of 60 seconds before he pushed it off the pedestal. Then we were told that for the first part of this challenge, we’d have to build a replica of that very same Lamborghini from memory, in only four hours. What??

Screen Shot 2021-07-21 at 7.18.26 PM.png

We were each given the “essential” LEGO Technic parts pulled from the Lamborghini set that would be needed to recreate the car. It wasn’t even close to the number of parts in the actual set--which I was happy about, since that would’ve been so overwhelming. We were allowed to use the brick pit to supplement our builds. The parts they gave us essentially made up the skeleton of the car, and most of them were oddly-shaped Technic parts I had never seen before. You can see us in the episode looking at the parts like “what are these??”

Lauren and I decided to stick to our guns and create a brick-built base using black plates, which we thought matched the dimensions of the original car. We then built a frame of Technic bricks on the interior to which we could attach the lime-green skeleton exterior.

I’m no master when it comes to Technic, so I was learning on the fly how all these crazy parts fit together. Lauren took trips to the brick pit to gather all our supplemental parts as I tried to cobble something together like a mad scientist. The main advantage I felt I had was knowing the general shape of a Lamborghini. Wide, and low, with a square back section and pointed front. They’re inspired by charging bulls (oddly correlated to the next part of the challenge), and are meant to look menacing with sharp lines.

Screen Shot 2021-07-21 at 7.11.04 PM.png
Screen Shot 2021-07-21 at 7.12.39 PM.png

One aspect we struggled with was how the colors were broken out. You heard in the episode other teams going through the same issue--which area was black? Which area was green? I thought the top of the car was black, and Lauren insisted green. We went with black, but turns out it was both. We built little seats to go on the inside of the car to get some extra detail in there, but struggled a bit with creating the right shape of the windshields using flex tubes. I opted to place the flex tubes lower to capture that sports car shape, even if it was impossibly low for a person to actually fit in the car, which the judges called us out for!

When this part of the challenge was over, we just had to laugh. It was a non-elimination build, so some of the pressure was off. Honestly, I felt alright about our car. I was amazed we were able to put something together in 4 hours that looked kind of like a Technic Lambo. When we were all looking at each others’ cars, both Philip and Richard told me that ours reminded them of a Lamborghini Countage from the 90s. I had never heard of it, so Philip showed me pictures. He was right. Turns out we had built something that looked like a Lambo, only it was one from 3 decades ago.

When it came around to judging for this first challenge, Lauren and I were surprised and honored to get a top two mention from the Brickmasters. It wasn’t shown in the episode unfortunately, but it made my seventh-grade self proud.

Screen Shot 2021-07-21 at 8.02.35 PM.png

Then we moved on to part two: the demolition derby. We had to build a crazy concept car on a remote control chassis that would go head-to-head with the other teams’ cars in the arena. We were each provided a standard R/C chassis, which had yellow Technic liftarms glued to the perimeter of the base.

IMG_7610.JPG

Lauren and I decided to build “Beware the Bull.” We were inspired by fierce, charging bulls, and wanted to blend that ferocity with the ornate style of Spanish matadors. We set out to create a bull-like car that has stolen the matador’s cape, and is wearing it into the arena. For the racing stripes on the side of the car, we wanted to incorporate the gold detailing of a matador costume. 

Screen Shot 2021-07-21 at 7.19.06 PM.png

I was happy about the base chassis at first--at least we wouldn’t have to build our own chassis! But as we started building, I realized this setup was going to be really difficult to work with. The glued-on Technic liftarms were supposed to be “in system,” meaning proportionally scaled to LEGO bricks, but that turned out to not really be the case. We had to stretch and bend the bricks to get them to fit on the base. Lauren and I started by building a super-sturdy core. We locked Technic bricks to the baseplate, and built a strong, interlocked brick body with SNOT bricks on the side. We tried multiple techniques to get the core to stay on correctly, and it ate into our build time. By over halfway into the build, all we had was a super-solid core, with no aesthetics.

Screen Shot 2021-07-21 at 7.39.24 PM.png

Lauren then tackled the intricate gold detailing on the car’s racing stripes, while I built the bull’s face and horns--making sure to include a nose ring using a flex tube! We also wanted the matador cape flying off the bull’s back to be a cockpit of sorts. With two hours left, I built the cape with several Technic liftarms anchoring it at an upward angle in a really strong position. While the cape might appear like it’s flapping in the wind, it was super sturdy. We also had to include a certain amount of space for a dashboard camera on the car, so I made sure to include that as well.

Screen Shot 2021-07-21 at 7.41.52 PM.png

When the Brickmasters came around and we told them our idea, we got to talking about movies and how we wanted to call the build “Racing Bull” as a spin on “Raging Bull.” That name didn’t fly with production, so we adapted to “Beware the Bull.” When I mention it to Lauren in the episode, that is us brainstorming our new name! With about 30 minutes left to go, I quickly added fenders on the front and back of the car using angled Technic liftarms (again) to achieve the look. Lauren added gold details to the cape, plus the purple racing stripes that continued down the back of the car. This one was a race to the finish (no pun intended); 6 hours was not enough time! We were frantically placing finishing details on our taillights and fenders right until the last second.

Screen Shot 2021-07-21 at 7.38.42 PM.png

The build was done, and it was time for the derby. I had practiced driving a little bit; we thought Lauren might do it, but after she tried it once, she quickly decided that I should be R/C Master. I’ve never driven a remote-controlled car before, so this was totally new to me. The control had two little wheels that looked like tires: one for turning, and one for forward/backward. It was not intuitive at all!

Once the derby started, I drove the bull right into the center of the ring and SMASHED into 3 other cars. The bull hung on really well! The front fenders, intended to bounce off the others and give a buffer, did just that for this first impact. We expected a lot of our gold detailing to fall off, but it didn’t at all.

Screen Shot 2021-07-21 at 7.27.41 PM.png

Here’s the thing about the derby arena. It had hazards EVERYWHERE. Little tires, barrels, all kinds of things intended to disrupt the cars. What the producers didn’t anticipate, however, is that almost all of our cars would get stuck on these tire hazards. Unfortunately, the bull was one of the first to get stuck. I drove the car almost immediately over a giant tire, and it got perfectly wedged underneath the chassis. The rule was that if your car couldn’t drive for 60 seconds, you were out. Michelle was so great and tried to knock my car out from its stuck position (in the show, it looks like the unicorn was trying to attack the bull, but it wasn’t!) Unfortunately, it stayed stuck on the tire, and our car hit the 60 seconds really early on. It was a bummer, because the car had held up really well through all the impacts. What we didn’t expect was that this challenge was more about surviving the tires than the other cars!

Screen Shot 2021-07-22 at 4.20.41 PM.png

I couldn’t believe when Caleb ran his car off the edge of the table. It seemed like TOO perfect of a TV moment. I felt so bad for them; their car was amazing, and totally embraced the challenge! I thought it was funny that our car had the perfect vantage point to see them careening off the edge: the bull was stuck on the tire at that point, right in the perfect spot for the dash cam to catch one of the most entertaining moments on LEGO Masters so far.

This challenge was definitely difficult, and not really in our wheelhouse. We wanted to bring a fun story to the derby with our bull and its stolen matador cape, and we think it would’ve done really well if it wasn’t for those dangerous tires! And, of course, we were really excited about our top two finish for the Lamborghini. Guess it might be time for me to pull out the old sports car posters again--or go buy that set. Might be a bit easier with the instructions.

Screen Shot 2021-07-21 at 7.23.47 PM.png
Screen Shot 2021-07-21 at 7.41.34 PM.png
Screen Shot 2021-07-21 at 7.23.01 PM.png
Screen Shot 2021-07-21 at 7.21.09 PM.png

One Floating Brick - Episode 5 Breakdown - LEGO Masters

In the summer of 2021, my sister Lauren and I appeared on the second season of LEGO Masters on FOX. These breakdowns delve into each episode and talk about the process behind the build, the challenges Lauren and I faced, and the stories of our finished products.

Every episode, we walk in and expect to see something crazy. That didn’t happen for episode 5. Will and the judges were standing there next to a little podium, topped with a stack of papers. My mind started spinning with what it could be. I was hoping they were scripts. A storytelling challenge? Write your own script!? Would we finally be building something that could just sit on a table, and didn’t have to perform in some crazy way??

LM-S2_205_ScFinalBuilds_RVM-TG0097_f.jpg

The answer...nope. In fact, they were taking the tables away from us. Will’s “boss” told us that we had to build something floating from a single, hanging Technic 1x14 brick. We saw the bricks come down from the ceiling, and someone on the crew told us they’d been there the whole time, just hiding up in the rafters. What?! I guess if we looked really closely at the ceiling in the previous episodes, we could’ve seen a future challenge.

Lauren took the lead on our story concept. She was inspired by her favorite Barbie movies from growing up, one of which included “sky painters.” She thought it was a cool starting point, and I agreed. I saw the potential in using all the really interesting colors in the brick pit to create gradients like a sunrise and sunset. We love watching sunrises and sunsets in California, and wanted to capture some of that magic in the build.

So, we decided to build the Palace of the Sky Painters. Perched in their crystal castle in the clouds would be two sky painters: Sunrise and Sunset. On one side, Sunrise would be painting with her light blues, pinks, and yellows. On the other would be Sunset, painting with her deep purples and oranges. Their brushstrokes would combine to meet at the sun.

Screen Shot 2021-07-07 at 7.12.37 PM.png
Screen Shot 2021-07-07 at 7.52.31 PM.png

It didn’t sound too tricky in theory, but building from one hanging Technic brick proved to be really difficult. The wires holding the brick to the ceiling were wrapped through three of the Technic brick’s holes, so those were out of commission. Every time you attached a brick, the whole build would spin, and it was easy to lose track of what part you were working on. I started by building a (hopefully) strong box structure with SNOT bricks on the side. We saw most other teams adopting a Technic core structure for their builds. For better or worse, I used a basic brick structure to create our core.

Screen Shot 2021-07-07 at 7.52.56 PM.png

Lauren started by building large spherical sides, like those that would be used in giant Lowell spheres. We had built large spheres like this before for an “Ice Cream Island” creation, and decided to just make a ton of them to create a round, fluffy cloud.

The cloud proved to be way more time-consuming than we expected. I was really struggling with the core: both the dimensions, and not being sure how it would match up with Lauren’s spherical sides. I had a bit of a breakthrough when I realized I could build the core as separate compartments, attached by Technic pins. Still, when the cloud sides went on, the core was still a little too big, so we had to cover the bottom with an additional plate layer. We definitely could have strategized this a different way, but with time running out, we had to work with what we had. When the Brickmasters came around, we had very little to show. Jamie didn’t like that our build was hanging slightly askew, so we figured we’d come back to address that.

Screen Shot 2021-07-07 at 7.15.00 PM.png
Screen Shot 2021-07-09 at 9.05.37 AM.png

With half of the time gone, we weren’t even done with the cloud--the bottom still had to be built. I switched gears and moved on to the characters. I was trying to make them feel like cartoony, other-worldly fairies, whose look incorporated the colors of their paint brush strokes. I had to go through a couple face designs, and still could have tweaked them for longer if we had more time. I gave them wings for eyelashes, and built their eyes with multiple round plates slightly off-set to give a wide, “eye-shadow” look incorporating each character’s colors.

Lauren meanwhile moved on to the palace, which we decided would be made completely out of translucent bricks. Since those bricks have very few available shapes, we were limited by what we had. Lauren built up a very tall castle with 1x2 bricks, 2x2 slopes, and 2x2 round bricks, all translucent. It was pretty tall, and really cool. The problem is, with only those types of bricks on-hand, it’s hard to build strong.

IMG_7342.jpeg

At this point, Will came over for a check-in, and decided he wanted to call our mom. The producers brought Lauren’s phone out of holding, and he called her. Amazingly, our mom picked up! Will called her by her first name, Margie, and they got to chatting. He asked if she had a favorite kid, and our mom gave a perfect answer (no). He asked if I had always worn blazers, and to my embarrassment, she recounted a story of my first formal dance where I wore a blazer. She talked about how she handled us when we misbehaved, and how rewarding it is to see your kids pursue their creative passions. Will and her got along great, and they’re on a first-name basis now. All the producers loved the call, too--we were very surprised it didn’t end up in the episode!

After Will called our mom, we had about 4 hours to go. I started quickly making the Sky Painters’ brush strokes, using the really cool colors I found in the brick bit. For those into LEGO colors, for Sunrise I made a gradient with: dark azure, medium azure, bright pink, and bright light yellow. For Sunset, it was dark purple, dark pink, orange, and bright light orange. I made these with a pretty standard brick-built curvature technique, though I wanted the strokes to start small at the top, and widen as they go along to give some contour to the shape.

Screen Shot 2021-07-08 at 1.20.49 AM.png

A challenge with creating the paint strokes was the limited types of bricks available in each color in the brick pit. I had to make lots of substitutions: two 1x2 bricks to make a 2x2, two 1x3 plates to make a 2x3 plate, that sort of thing. It made the whole process more time-consuming. With 2 and a half hours left, I was done with the paint strokes, and had to get going on the sun. 

Screen Shot 2021-07-07 at 7.17.42 PM.png

The sun was attached to the paint strokes through a central box structure that had SNOT connections on all sides. This allowed me to create rounded discs at the front and back of the sun that could be attached later. I then used a bunch of orange wedge plates to create the rays of the sun radiating out in all directions. I included 3 layers of rays, all off-set from each other. This design was inspired by a rotating sun that I’ve always loved on It’s A Small World at Disneyland.

Screen Shot 2021-07-07 at 7.31.16 PM.png

With less than an hour to go, we still had to finish the bottom of the cloud, which we had saved to the end to do the more essential features. Lauren started working on it, when...CRASH. My heart dropped, and I saw the entire top part of the palace collapse, and hit Lauren in the face on the way down. And, to make things even more stressful, Will saw it happen. He came over to us, and I was just trying to keep it together. As you can see in the episode, we just needed to keep building while he was there. I was smiling and laughing along, but inside I was thinking we have so much to get done still! You have to let us build!

Screen Shot 2021-07-07 at 7.33.40 PM.png

We had lost half our palace, and the underside of the clouds wasn’t done. I was also thinking about Jamie’s note that the cloud was askew--I didn’t want that to impact our judging. To address this, I started building out the underside of the clouds with standard brick, rather than the SNOT sphere technique we were going for, to try to get one side of the cloud to be heavier. It kind of worked, but I think we sacrificed some of the aesthetics as a result. Maybe if I had the chance to do it over, I would’ve cut my losses on the build hanging askew to have a cleaner cloud sphere design.

Screen Shot 2021-07-07 at 7.13.04 PM.png

Lauren worked on salvaging the palace, which she built up to a portion of its former size. It’s not as grand as it was before, but it at least looked like a more finished structure. With 2 minutes to go, Lauren and I added little translucent discs to give a cotton candy pop to the cloud. When time was up, we were exhausted. This was our first build where we were really scrambling for time, and had to make some sacrifices as a result. I was happy with some parts of it--particularly the brush strokes and the sun--but I felt this end result was less polished than our previous ones. One thing we loved about the build was the shape. It stood out in the room for its bright colors and the unique curvature of the sides. The Brickmasters noted that this build definitely couldn’t sit on a table, so they liked that we embraced the challenge with the concept and execution. It certainly had its shortcomings, but this was a build that made us more motivated to have better time management on the next one. And, it’s pretty cool that Will and our mom are best friends now.


IMG_7343.jpeg
Screen Shot 2021-07-07 at 7.05.42 PM.png
Screen Shot 2021-07-07 at 7.04.34 PM.png

Hats Incredible! - Episode 4 Build Breakdown - LEGO Masters

In the summer of 2021, my sister Lauren and I appeared on the second season of LEGO Masters on FOX. These breakdowns delve into each episode and talk about the process behind the build, the challenges Lauren and I faced, and the stories of our finished products.

When we saw popped-collar Will posing with a photographer as we walked in, I had two thoughts: 1) he’s weirdly good at this, and 2) uh oh. We have to build fashion.

76406389-084C-4390-B279-9D0407035E9D.JPG

My first guess was that we might have to build an item of clothing, like a dress. Never in my wildest imagination would I have thought we’d be asked to build a hat that could stand on our heads hands-free for 5 seconds, and make it down a catwalk. Just insane.

Then we heard the dimension requirements for the challenge: 100 studs (2.5 feet) wide by 60 bricks (two feet) tall. What?!? 

Screen Shot 2021-06-23 at 10.43.31 AM.png

Lauren and I pulled the color red from our garment bag. It’s a bold, bright color that actually posed quite a challenge for us. Red is dramatic, seductive, powerful, violent--not the usual emotions we go for in our builds. We took longer to figure out our concept in this challenge than any other. Lauren is a fashionista, but crazy LEGO hat fashion is a bit different than real fashion. No ideas were hitting, until finally, I reached into the depths of my fantasy-obsessed brain and pulled out...a phoenix! It’s powerful, striking, and of course, red. I also liked the dynamism of a phoenix rising from the ashes. It seemed like a strong image, and would make Dumbledore proud. Lauren took a bit of convincing, but soon she was on board.

Screen Shot 2021-06-23 at 10.45.09 AM.png

I got to work building a ring that could fit around Lauren’s head. This was our first challenge where we weren’t building off a baseplate, which comes with its own challenges when the baseplate is your teammate’s head. I then built a curved brim stretching out 100 studs wide--to make sure we had that requirement locked, and to hopefully add a fashion flair with the curvature. I imagined the brim and dome of the hat would be black, to look like “ashes” for the phoenix to rise from. While this was happening, Lauren started working on the phoenix wings with red wedges and lots of translucent orange, yellow, and clear plates.

One thing I was very concerned about was weight. I knew Lauren would have to wear this thing down a runway, and I didn’t want it to crush her skull. So I tried to build the main dome of the hat with SNOT technique, using lightweight plates on the side. But then I remembered...the hat needs to be strong, too. It needs to support an entire phoenix build on top. So I started over from scratch, and built up the base of the hat with straight brick (sorry, Lauren’s head!) This technique is a little more blocky, but also creates a smoother look that enabled me to build translucent “embers” crawling up the dome.

Screen Shot 2021-06-25 at 1.11.59 AM.png

While this was happening, Lauren got to work on the fire ribbons: a late idea to make our creation look distinctively like a hat, and not like a phoenix model on top of Lauren’s head. They ended up being one of our favorite features!

Screen Shot 2021-06-23 at 11.03.19 AM.png

Something that changed significantly over the course of the build was the pose of the phoenix. When the Brickmasters came around halfway through the build, I told them I was planning to have the phoenix wings stretched backward, to be more like a feathered cap. The judges suggested that I give the phoenix a more dynamic pose, where we could clearly see its face and all the work we put into the fiery wings. I then adjusted the pose to have the head facing sideways, so its eye was clearly visible, and moved one wing to be at a 90 degree angle from the other. This was an awesome note from the Brickmasters that definitely made our hat better!

Screen Shot 2021-06-23 at 11.01.21 AM.png

With 3 hours left, the judges and Will hit us with something we knew had to happen eventually: a twist. They said we had to not only build a hat, but an accessory as well. Lauren and I looked down at all her fire ribbon panels, and knew we could build a big necklace out of them, connected by Mixel joints. I went to build an amulet, which we decided should look like the eye of the phoenix. What it ended up looking like was the eye of Sauron, but I didn’t mind. I’m a HUGE Lord of the Rings fan, so this felt like a perfect way to pay homage to my favorite film trilogy and favorite LEGO theme.

Screen Shot 2021-06-23 at 11.04.00 AM.png

With an hour left to go, I scrambled to finish the phoenix eye amulet while putting finishing touches on the phoenix tail. We had spent a lot of time building up the flames on top of the “ashes,” so I did some touch-up work to make sure the fire looked vibrant and alive. Lauren had effectively draped the fire ribbons around the hat, and we crossed them in the middle for a more striking composition. Thank goodness for the flexibility of those Mixel joints! Lauren also built pools of lava on the brim of the hat out of translucent plates. Finally, the build time was over, but we couldn’t rest easy. We still had the runway.

Lauren had practiced with the hat a couple times, and we found that it was most comfortable and fit the best when she wore a beanie underneath. We got really good at picking the hat up and putting it back down on the mannequin, and thank goodness the bricks held together each time we did. When it was time for Lauren to go out on that runway, I gained a whole new appreciation for stage moms.

Screen Shot 2021-06-23 at 10.24.43 AM.png
Screen Shot 2021-06-23 at 11.02.51 AM.png

Lauren did incredible. She was completely confident the entire time, and worked the runway like she’s been doing it for years. She did a striking pose at the end--we had done some coaching sessions on just how to pose the eyebrows--and she was able to easily balance the hat for 5 seconds. She turned back very quickly, giving me a minor heart attack, but the hat stayed together! The ribbons added a nice flair at the back, and you could still see the phoenix’s eye staring you down, even when she turned around. She effortlessly did one final pose, and was done. I was so proud of her.

Screen Shot 2021-06-23 at 11.03.12 AM.png
IMG_7075.jpeg

We then had to put the hat on one more time for a runway walk with all the contestants, and thankfully it still held together for judging. This challenge was easily the hardest thing we’d ever been asked to build out of LEGO, and the most outrageous. I still am not quite sure how we pulled it off, but I’m really proud of what we were able to build, and even more proud of my sister for making that phoenix rise on the runway!

As Will said during her walk, “the Pheonix never goes out of style. It always finds a way to rise from the ashes.”


Screen Shot 2021-06-23 at 11.01.03 AM.png
LM-S2_204_ScJudging_RVM-TG0039_f.jpg
212503DF-9585-4386-8CD5-24C9283E4351.JPG

Make n' Shake - Episode 3 Build Breakdown - LEGO Masters

In the summer of 2021, my sister Lauren and I appeared on the second season of LEGO Masters on FOX. These breakdowns delve into each episode and talk about the process behind the build, the challenges Lauren and I faced, and the stories of our finished products.

When Lauren and I heard “Make n’ Shake” for Episode 3, we knew we were in for the most technical challenge yet. We’re not engineers, or architects. How do you build a 4-foot structure that can withstand intense forces, AND make it look good? 

LM-S2_203_ScFinalBuilds_RVM-TG0054_f.jpg

The first thing we needed to settle on was our concept. Almost instantly after the challenge was announced, Lauren whispered to me “let’s build a cake,” and I immediately thought “YES.” That would be right up our alley. We love bringing storytelling into everything we build, and although it wasn’t featured in the episode, we came up with a full story surrounding what would become our giant cake, all before we started laying bricks down:

Georgina the Giant is a princess in the land of giants, and today is her special day. The royal chefs have prepared a cake with all her favorites: bright-colored frosting, 4 layers, and tiny human sprinkles, all screaming for their lives. She loves them! Every year, Georgina gets so excited about her birthday that she bounds into the room, toppling her cake. But this year, the royal chefs think they’ve made a cake that can withstand even Georgina’s birthday excitement.

Once our story was fleshed out, we then had to figure out how we were going to build this thing. We decided very quickly that we were going to stick to our guns, and build this cake the only way we knew would be strong: interlocking bricks, completely packed solid. There’s one problem with this technique, though. It’s extremely inefficient. That meant we had to build fast. Faster than we’d ever built before. We sprinted to the brick pit and grabbed as many 2x10 and 2x12 bricks as we could, and we got to work locking everything down.

Screen Shot 2021-06-16 at 11.00.07 AM.png
Screen Shot 2021-06-18 at 11.06.40 AM.png

Then, we realized there was another challenge that we didn’t anticipate going in: the baseplate we were given. Everyone was provided a gray baseplate with glued-on brick structures that included some SNOT connection points and Technic connection points. It did not work with our plan of interlocking bricks at all, but we were stuck with this glued base. We decided to use some of the SNOT connection points to lock our bottom layers down on the interior, before building up with straight brick. If I were to do this challenge again, I would have just ignored the base and built brick all around it, to have one consistent technique all the way through. But we were totally thrown by this baseplate designed to “help” us!

Once Lauren and I started building the cake up with layer upon layer of interlocked bricks, it was off to the races. Our fingers were sore, aching, and calloused, but we powered through. At the top of each layer, we included SNOT connections to allow for icing to be built out on the sides using curved white plates for a scalloped edge.

Screen Shot 2021-06-16 at 11.08.00 AM.png
Screen Shot 2021-06-16 at 11.19.33 AM.png

Around half-way through, we looked over and realized there might be another cake in the room. We had our heads down the whole challenge with frantic brick-laying, so we had no idea that Natalie & Michelle had a similar idea. Luckily, theirs was a wedding cake, which is pretty distinct from a birthday cake. That didn’t prevent the producers from trying to make “Cake-Gate” a thing!

Lauren and I were frequently measuring our build with the tape measures we were provided, to make sure we were pacing ourselves correctly in terms of height. We’d get so absorbed in locking the bricks that sometimes we’d forget to check the height--so our second cake layer got to be quite big! We were already well past 2 feet at the 4-hour mark, which is what we wanted, since we needed time at the end to make the birthday cake come alive with candles and sprinkles.

With exactly an hour left to go, Lauren and I were done building the main structure of the cake. We then got to create all our crazy details! Lauren rushed off to the minifigure bin of the brick pit to find every single scared-looking minifigure face, as well as every pink and blue outfit to match the color scheme of our cake.

LM_203_Lauren&Bryan_CU_4.png

While Lauren was cranking out over 100 minifigure “sprinkles,” I built the candles for the cake. I lucked out in finding some round, ridged 2x2 gold bricks in the brick pit, which looked just like massive candles when stacked! I added large flame parts to the top, and they were good to go. I also gave the frosting layers some extra texture on the top, which served a double purpose of holding in the sides. We wanted to make sure we didn’t have any flat, breakaway surface layers, and were able to hide our reinforcement in the frosting.

LM_203_Lauren&Bryan_CU_3.png

Lauren was still powering out the minifigure sprinkles with 10 minutes to go, and I was frantically placing them on the cake at all kinds of crazy angles, like they were plastered there and left to scream for their lives! Lauren made some really funny figures--some are holding bananas, one guy is even holding a crab. We placed some human food on there for Georgina to enjoy: ice cream cones and pies. We had a surfer dude, a cat lady, and even some pugs. The only thing they had in common was their scared expression, and their appreciation of pink and blue outfits.

Finally, time was up. Lauren and I carefully wheeled our build into the gallery--terrifying images of Season 1 flashing through our heads!--and once it was placed in the gallery, we were happy with how our final product looked aesthetically. But, would it be strong?

As Will fired up the Brickter Scale, I wasn’t too nervous at first. Our building was so dense, and we had put an intense amount of effort into packing the whole thing solid. But as it got up to the higher levels, I got a bit more nervous. Once it hit level 8, one part started to crack: the base. I should’ve seen it coming! The one part that wasn’t packed solid with bricks was the one part that started to fall apart. It still held on with some sway at 9, and then finally the whole base caved away at 10. It led to a clean break, and the tower made a crazy THUD as it hit the ground. I remember thinking it must’ve made a dent in the floor! Would production care about the floor??

Lauren and I were proud of how this build came out and the story behind it. When we were telling our story about Georgina the Giant and the human sprinkles to the judges, Will cracked up and stopped us--”Wait, you know this is a kids’ show, right?”

This episode flew by for us; we were so zoned-in on building as fast as possible. Our fingers were sore for days afterward! We just felt bad for whoever had to break apart our packed-solid cake. In the end, we think Georgina must have had a great birthday, and hopefully next year the royal chefs will bake a cake that can withstand a Brickter scale all the way to 11!


Screen Shot 2021-06-16 at 11.37.17 AM.png
Screen Shot 2021-06-16 at 11.39.23 AM.png

Hero Shot - Episode 2 Build Breakdown - LEGO Masters

In the summer of 2021, my sister Lauren and I appeared on the second season of LEGO Masters on FOX. These breakdowns delve into each episode and talk about the process behind the build, the challenges Lauren and I faced, and the stories of our finished products.

When we walked onto stage for Episode 2, and saw the words “Boom! Pow! Smash! Splat!” on the walls, we knew what we were in for. And we knew it was going to be epic.

This week’s challenge was the Hero Shot. We were each given a minifigure hero, and an element with which our build would spectacularly explode in the background while the hero walks away, unscathed.

Screen Shot 2021-06-09 at 3.24.32 PM.png

Lauren and I pulled the Ladybug, with the explosive element of colored dust. The first thing we think is: how do you make a tiny, cute Ladybug look like the toughest hero out there? But for every hero, we know there needs to be a villain. LEGO Batman taught us that. We toyed with some villain ideas--a praying mantis? No. Too spindly. Then the obvious hit us: a frog. Its tongue could be stretching out, right about to eat the ladybug until...she blows it to smithereens!

We also wanted to incorporate our element in a deliberate way that worked into our story. Yellow colored dust could look like pollen, and lily pads often have flowers on them. So, our story started to form: Lola the Ladybug plants a pollen bomb in the flower on the lily pad, and detonates it right as the frog is about to eat her.

Screen Shot 2021-06-09 at 3.28.07 PM.png
Screen Shot 2021-06-09 at 4.05.26 PM.png

I got to work building the face of the frog, while Lauren started putting together the lilypad. I realized very quickly that building to break is much more difficult than it sounds--especially when you’re trying to build sculpturally. I am so used to locking at multiple points, but for the frog’s face, I tried to make every brick attached by as few studs as possible, so it would be ready to blow. It kept breaking apart on me as I was building, but after about 2 hours, I had an outline of a face that looked like it would work. As an experiment, I added a couple of round, translucent  submarine window parts over the eyes, and it ended up having a cool reflective effect that I didn’t expect. Lauren meanwhile built the beautiful flower on the lily pad, using white wedges and pink plates, angled with rocking plates. It turned out great! 

When the Brickmasters came around and saw our frog face, Jamie said it felt like he was at LEGOLAND. Having gone to LEGOLAND California almost every weekend as kids, Lauren and I loved this--we were totally influenced by the awesome animal builds we saw there. Jamie recommended putting the frog in a more aggressive pose, like he’s leaping out at the ladybug. I thought that was a great note, and course-corrected to get the frog’s legs flailing out behind him. 

IMG_6684.jpeg
Screen Shot 2021-06-09 at 4.26.53 PM.png

Something we loved about this challenge from the beginning is that the Brickmasters told us to “be the director.” I love to direct short films in my spare time, so this felt like something right up my alley. I really liked framing up the shot by kneeling down in front of our hero fig to see just how it would look on-camera. This helped me adjust the pose and the eyes of the frog so it would look like it was staring down its prey. It also helped Lauren readjust the flower petals: the front ones had to be angled downward, so that the whole flower could be seen from our ladybug’s perspective.

Screen Shot 2021-06-09 at 4.08.53 PM.png

On the flip side, something that was especially hard with this challenge was figuring out where to put the explosives. We had to build compartments to house the explosive material (squibs, which are usually used to create fake gunshot impacts in movies). Trying to build strategic compartments inside an already-fragile frog proved to be difficult, and led to several re-designs. We decided to put all our explosives inside the frog, packed right behind his head so it would all blow outward, hopefully sending his long tongue flying and preserving the ecosystem around our hero.

Screen Shot 2021-06-09 at 3.34.36 PM.png

With two hours to go, I built the tongue as flimsy as I could, using stacks of 1x2 pink bricks side-by-side, with minifigure legs on the end to get the curl at the tip. While this was happening, Lauren built up the lovely reeds and cattails in the pond. We took a gamble with those: part of our story was that the reeds would stay standing after the explosion, but the only way to build them is long, thin, and ultimately rather weak. We placed the reeds behind the frog, in the hopes that the explosion would be directed forward and outward, saving everything behind. 

Screen Shot 2021-06-09 at 3.46.56 PM.png

With 10 minutes left, we scrambled to do the finishing touches: I added all the little yellow freckles to the frog, and Lauren built some nice ripples in the pond using translucent plates. One of the frog’s legs fell off with 30 seconds to go, and I scrambled to put it back in place right before Will said “time’s up.”

While they didn’t show it in the edit, we all had to move our builds from the judging podium to a second podium where the explosion would be filmed. We made sure to move it as gently as possible so the fragile build and long tongue wouldn’t break apart. 

When it came time for the explosion, Lauren and I were nervous. Would the explosives work the way we wanted them to? Would the frog face even break apart? Would the hero minifig fall over? Then Will said “it’s time for this froggy to croak,” and...BOOM.

Screen Shot 2021-06-09 at 4.08.53 PM.png
Screen Shot 2021-06-09 at 4.09.01 PM.png

From where we were standing, we couldn’t see what happened to our build, or if the fig stayed standing. It was blocked with all the camera equipment filming the explosion. I quickly ran to see behind the cameras, and...Lola survived! We then watched the slow-mo instant replay, and realized just how close it was. The frog’s tongue shoots outward, pink minifigure legs flying, and ALMOST hits Lola. Crazily enough, she was saved by her little pollen TNT detonator, which stopped the tongue and sent it flying in another direction.

Screen Shot 2021-06-09 at 4.09.22 PM.png

Lauren and I were so excited with how the explosion came out. It could’ve gone wrong in so many ways! But in the end, the habitat was safe, and Lola pulled off her epic stunt scene and got rid of her froggy predator for good. We were so thrilled and honored to be called by the Brickmasters to win this challenge--there were so many AMAZING builds, and this group is so incredibly talented. We were just happy that Lola made it to fight another day, and we hope the next frog will think twice before trying to eat a stunt hero Ladybug.

Watch a full “brickdown” video of our episode 2 build here.

Screen Shot 2021-06-09 at 3.49.01 PM.png
Screen Shot 2021-06-09 at 4.03.04 PM.png
Screen Shot 2021-06-09 at 4.27.12 PM.png
Screen Shot 2021-06-09 at 4.24.10 PM.png

LEGO Day Parade - Episode 1 Build Breakdown - LEGO Masters

Hi everyone! In the summer of 2021, my sister Lauren and I appeared on the second season of LEGO Masters on FOX. These breakdowns will delve into each episode and talk about the process behind the build, the challenges Lauren and I faced, and the stories of our finished products.

Screen Shot 2021-06-02 at 3.42.43 PM.png

Episode 1’s challenge was the LEGO Day Parade. We were tasked with creating a parade float that would represent us—while showcasing our creativity, storytelling, technical ability, and in this case, motion. Lauren and I immediately got thinking about what represented us: childhood stories, and fairy tales. Lauren LOVES to read fairy tale novels, and I make fantasy short films. Storytelling’s been a huge part of our lives, and it all started with our parents reading us bedtime stories. So we set out to create Sibling Storytime: our mom would be reading us a bedtime story at the base of the float, and we’d see that story spring to life out of the pages of a book. We chose our fairy tale to be Rapunzel. Lauren and I were very influenced by the Fairy Tale Boat Ride at LEGOLAND California growing up, and wanted to bring that playful LEGO fun and humor to our model. So, we decided to put a twist on the classic story: the Prince is tugging on Rapunzel’s hair, which she doesn’t appreciate at all!

Lauren’s main objective at the beginning was to build the lush green environment at the base of the float, while I focused on Rapunzel’s tower, and the characters. I started with the characters: I wanted them to be brick-built, rather than minifigures, to get that cartoon-y, larger-than-life feel just like in a child’s imagination. It was really fun to create the expressions on both characters’ faces—a personal favorite of mine is the Prince, with his mouth agape and his eyebrows raised in shock.

Screen Shot 2021-06-02 at 3.43.14 PM.png

Once the characters were built, I had to get going on the critical feature of the build: motion. We decided our motion would be with our Prince, hanging off of Rapunzel’s hair in an undulating, swaying movement. Creating motion with LEGO motors is a relatively new thing for me; I have some practice with it, but it’s limited. One thing I knew for sure is that I wanted a more complex motion, that converted the circular motion of the motor into something else. With Technic, I built a gear arm that creates a whip-like lever motion. I attached the gear arm to one of Rapunzel’s locks of hair, and the motor and hub were placed inside our hollow tower.

Screen Shot 2021-06-02 at 3.43.23 PM.png

The big challenge with this movement was getting the large, brick-built Prince to stay attached. LEGO motors function best when they’re moving light weights—maybe a few ounces. This Prince character was about a pound. I decided to use an angled Technic beam as one of his arms, wedged perfectly against his side. I attached that Technic beam to the motorized lock of hair, and it worked! He was hanging off the hair, with a somewhat-violent motion that looked like he was tugging. Brickmaster Jamie mentioned that he didn’t know how we achieved such a heavy object hanging onto a motor like that—not entirely sure I do either, but I bet he could figure it out pretty quickly!

Meanwhile, Lauren was tackling her biggest objective: the massive storybook framing the back of the float. One detail we really wanted to include was having “writing” on the pages of the book, using black plates within the white pages. The pages were on hinges so they would open like a book, and the blue binding has a nice gold frame around it. She did a great job!

While the book was coming together, I went super-speed on building up the octagonal pink tower. That was a place I knew we could save time, considering the motion was time-consuming. One thing I didn’t anticipate, however, was how tricky it would be to get the balcony onto the tower. I built the balcony as a circular platform out of standard bricks—without thinking how I’d place it on top of an octagonal tower. There ended up being only two small points on the tower that aligned with the circular balcony—the rest of the octagonal tower supports had to be tiled over. I was very worried about pressing the Princess onto the balcony—what if the entire balcony caved into the hollow tower? Luckily, it didn’t, and you can see my look of relief when Rapunzel fit right on there.

While this was happening, Lauren was busy at work on the base of the build. Once the book was fastened at the back (using some carefully-positioned jumper plates), she got to work building a vibrant green meadow that looked like it had grown straight out of the book. At the front of the float, she built a lovely blue lake that’s spilling over the sides like a waterfall. She included bright green vine parts and lavender flowers stemming from the pages of the storybook, which added a really nice touch. She also made several small trees, using a technique with a 4-sided SNOT brick and wedges. They ended up looking like pine trees straight out of a fantasy forest!

Screen Shot 2021-06-02 at 3.44.37 PM.png

As the base came together, I got to work on a second piece of motion—the other side of Rapunzel’s hair. It’s easy to miss in the episode, but Rapunzel’s hair is moving on the other side of the tower, just like the Prince is tugging on it. I included a second motor and gear arm there, attached to another lock of hair. This one was much easier to achieve without a heavy Prince hanging on!

Screen Shot 2021-06-02 at 3.45.35 PM.png

Rapunzel’s hair then swept all the way around the tower to connect with the swaying Prince on the other side. When Brickmaster Jamie came around for his check-in, he noted that the Prince should be in some kind of peril, to motivate him clambering onto Rapunzel’s hair to get away. We thought that was a great note, and built some thorny brambles at the base of the tower using ball joints and spiky Technic parts that the Prince desperately wouldn’t want to fall into. We loved that Jamie bought in to our story and gave great advice on how to make it more compelling.

With an hour and a half to go, we still had a lot to do. This was where the time stress really kicked in—I still had to build the whole spire of the tower, and the tree stump at the base for our minifigure scene. Lauren still had to build out all the lush greenery around the edges of the float, plus the cute minifigure bed and armchair for our storytime scene. We went into crunch time—thankfully, the spire came together in about 20 minutes, which freed up time to fix up everything else. We toyed with the idea of having our tree stump & minifigure scene spin—but ended up having to ditch that idea due to time. Lauren did a great job with the cute minifigure bedtime scene, and even had our minifig Mom holding a blue book, just like the massive blue book on our float!

Finally, time was up. We had finished pretty much everything we wanted to achieve, which we were proud of considering this was our first time building under a time constraint—with cameras, and judge check-ins, and meeting Will Arnett!

As the float came around the bend, I was worried that the motion of the float would affect the Prince’s precarious swaying motion—it was a miracle that it worked to begin with! I was so happy to see the Prince working great as the float came around the corner, and Jamie noted that he was surprised the motion kept going for such a long time.

While it didn’t make the final cut, part of our story is that the build begins with the minifigure scene—our mom reading us a bedtime story. That story is then coming to life in the float, springing out of the pages of the book. We built this as a thank you to our parents for empowering our creativity and imaginations.

LM-S2_201_ScFinalBuilds-TG0160.jpg
Screen Shot 2021-06-02 at 4.03.32 PM.png
Screen Shot 2021-06-02 at 3.46.04 PM.png